Today we’ve officially released OpenSprinkler firmware 2.2.0(1). As you may have noticed on this forum post, this firmware is a major revision from the previous firmware 2.1.9. Most of the new features are thanks to Valeriy Soltan’s excellent work almost 2 years ago (I know, time flies during the pandemic), including support for sequential groups, setting a date range for each program, support for pausing and resuming stations, shifting zones forward, more flexible master on/off adjustment times etc. In addition, we’ve added a device name parameter, which is included in all IFTTT notifications; and a new weather adjustment method called ‘Monthly’ adjustment is added to set a manual watering percentage per month. For OpenSprinkler 3.x only — one major step forward is the support of OpenThings Cloud (OTC) token, which allows remote access via the OTC cloud server. This eliminates the need for settings up port forwarding, which has been a pain for manual users. OTC has been enabled for our OpenGarage product for a while, and it seems to be working pretty well, so this is a good time to enable OTC for OpenSprinkler as well. A major benefit of OTC is that the same web interface / UI is available both locally and remotely, and OTC server serves as a real-time ‘relay’ between the firmware and user, it doesn’t actually store any date on the cloud server. Another step forward for OpenSprinkler 3.x is upgrading ESP8266 core to version 3.0.2 (the latest ESP8266 core for Arduino). In important benefit of this is that the WiFi and wired Ethernet are unified, through the lwip library available in this core version. As a result, wired Ethernet and WiFi use exactly the same interface functions, so all WiFi features (including OTA update) are also supported by wired Ethernet. Moreover, this allows OTC to be supported by both WiFi and wired Ethernet as well.
We’ve release a test version of firmware 2.2.0 a month ago and since then have been working on fixing bugs both in the firmware and the UI. At this point, the firmware is ready to be released to the public, and we are really excited. The full list of new features can be found in the Github release notes. As usual, firmware update instructions can be found on our support website at support.opensprinkler.com Since this firmware is very new, bugs and issues are probably inevitable. If you encounter any problem, please be patient and file a support ticket at support.opensprinkler.com We will try to handle them as quickly as we can.
We are happy to announce that OpenGarage firmware 1.2.0 is now officially available. The main change of this firmware is on cloud connection options for remote access: it now supports both Blynk and OpenThings Cloud (OTC) connections. Previous firmwares have only supported Blynk. The motivation for this change is the fact that the Blynk team is officially ending the Blynk legacy app and legacy server; in the meantime we have developed our own cloud proxy called OpenThingsFramework. So it’s the right time for us to push out our own cloud framework.
What are the technical differences? With Blynk, data is stored on the cloud server, which serves as a ‘cache’ between the application and firmware. In contrast, OpenThingsFramework is a proxy — it does not store data on the cloud server, instead, when a request comes from the application, it’s forwarded directly to the firmware, which sends responds back. This is implemented using WebSocket and persistent TCP connection. There are pros and cons of each approach. For example, Blynk has a faster response time, since the data is ‘cached’ on the cloud server; however, the firmware design is more complicated as the built-in web interface of OpenGarage cannot be easily replicated using Blynk. Also, some users may have privacy concerns over data stored on the cloud server. With OpenThingsFramework, data is never stored on the cloud server; and its proxy nature allows the same built-in web interface to be remotely accessible. This significantly simplifies the firmware design: only a small number of changes are needed in firmware code to allow remote access. On the other hand, the response speed can be slow, since the server does not ‘cache’ any data.
Both Blynk and OTC options are supported by our OpenGarage mobile app, as well as a simple OpenGarage web app that I wrote. To users, the practical differences are as follows: push notification is only available with Blynk, and you must have the Blynk legacy app installed on your phone. This legacy app is no longer available in the app store (since the Blynk team has discontinued it). However, if you are Android user, you can still find and install this app manually. That said, you can always use IFTTT for push notification, which is independent of either Blynk or OTC. If you need the ability to remotely access the full built-in user interface of OpenGarage, including changing settings and viewing log data, only OTC supports it. Otherwise, if you just need the ability to check door status and car status, and trigger door actions remotely, you can go with either of them. Please note that as the official Blynk server is going offline soon, if you want to use Blynk, we recommend you to create your Blynk token on our own server at openthings.io. The support article here explains how to create and use Blynk and OTC tokens respectively. I’ve also created a new OpenGarage video that gives you a quick walk-through of the steps. The section starting at 7:25 is about cloud tokens:
If you decide to upgrade to firmware 1.2.0, please note that it requires ESP8266 WiFi chip that has 4MB flash. Most OpenGarage units sold in recent years have 4MB flash, the only exceptions are the early versions (v1.0, 1.1 and 1.2 I believe). Also, as this firmware has changed the flash memory layout, it will trigger a factory reset so it will lose all settings and WiFi configuration. You will need to reconfigure WiFi after the firmware update. Finally, you can choose to use either Blynk or OTC, but you can’t use both of them at the same time.
It’s hard to believe that two years have gone by since my last post. Lots of things happened during these two years: on the good side, we have our first baby born during a year of pandemic, and he is bringing joy to the family every day. On the bad side, there is a pandemic, which brought so many challenges, from supply chain issues to shipping delays and to the difficulty of finding available employees to hire. The pandemic has also taken a huge roll on my mental health, significantly limiting my productivity and creativity.
This post is my attempt to resume regular blogging, a habit that I’ve always enjoyed in the past but was lost during the two terrible years. I am hoping this will motivate me to continue learning and sharing new knowledge about electronics, and continue to provide new passion in my life.
In this post, I will briefly summarize I/O expander choices I’ve considered when designing the OpenSprinkler circuits, and the pros and cons of each choice. I/O expanders are often necessary when the microcontroller’s I/O pins are insufficient for the application. For example, a sprinkler controller may need a large number of output pins in order to drive many zones independently. This is the reason that from the very first version of OpenSprinkler, I’ve decided to use an output expander, to allows the number of zones to be scalable and not limited by the available I/O pins on the microcontroller itself.
74HC595 Shift Register
The most common choice for increasing output pins is to use a 74HC595 shift register, or more precisely: serial-in, parallel-out shift register. 74HC595 is cheap, widely available, and quite simple to connect to a microcontroller like Arduino. Each chip adds 8 output pins, and you can daisy chain them to almost any number, limited only by the potential signal degradation/distortion when cascading too many of them. At the minimum, a microcontroller only needs to use 3 pins to interface with any number of daisy chained shift registers. These pins are named LATCH, CLOCK, and DATA, which are essentially CS, CLOCK, and MOSI pins in SPI terms. You can begin the data transfer by setting LATCH pin low, then at the rising edge of each CLOCK cycle, the HIGH or LOW signal presented on the DATA pin is transferred to the first storage register, while the data already transferred in previous clock cycles are shifted down to the next storage registers respectively, hence the name ‘shift register’. After 8 clock cycles, 8 bits of data are shifted in. Finally set the LATCH pin high, upon which the values in the storage registers are transferred and presented on the output buffers. You can bit bang the pin values, use Arduino’s built-in shiftOut function, or if CLOCK and DATA pins happen to be connected to the microcontroller’s SPI CLK and MOSI pins, you can use SPI functions for even faster operation.
One advantage of 74HC595 is that it has a separate set of storage registers vs. output latches (aka output buffers). During data transfer, this allows the output values remain stable and not affected by the data that’s being shifted in. The output values only update upon the rising edge of the LATCH pin. This compares favorably to other shift registers like 74HC164 that are even cheaper but don’t have output latches (thus the output values may flicker during data transfer and such the flickering would be problematic for output devices like sprinkler solenoids).
Pros:
Very cheap (a couple of cents in bulk pricing) and widely available.
Can be daisy chained to enable a large number of output pins
Relatively small number of microcontroller pins required to interface with it.
While the list of pros makes it sound like this is the perfect choice for almost any application, there are also a number of cons which are somewhat subtle but important for sprinkler controllers.
Cons:
74HC595 is output only, it does not support input pins (for that there are dedicated parallel-in, serial out shift registers, basically the opposite of 74HC595).
Maximum output current is small — according to the datasheet, each output pin can only source or sink up to 4~7mA, depending on the supply voltage. If the output device is a transistor or MOSFET, this is more than sufficient. But on AC-powered OpenSprinkler, the output device is a traic, such as MAC97 or Z0103MN, which require relatively large gate current, and 4~7mA is only barely enough.
Upon powering up, the output states are not deterministic — this means if LEDs are connected as output devices, they may have a brief moment of flickering upon powering up; similarly if the output devices are solenoid drivers like traics, some solenoids may be momentarily activated until the microcontroller clears out the output buffer. This problem can be alleviated by using an additional pin — the output enable pin — to disable the output latches upon powering up, but the downside is this requires another microcontroller pin.
The communication between microcontroller and shift register is one-way, so it’s difficult for the microcontroller to detect or enumerate how many shift registers are connected. On OpenSprinkler, I had to use an analog pin in conjunction with a parallel resistor per shift register to be able to detect/enumerate the number of shift registers. This is a downside, particularly if the microcontroller is short of analog pins.
I2C I/O Expanders (such as PCF8574/8575/PCA9555/9535)
Due to the advantages of 74HC595, I used it on the legacy versions of OpenSprinkler (1.x and 2.x) for many years, until I had to move on to switch the microcontroller to ESP8266, in order to support built-in WiFi. Suddenly the cons of 74HC595 became a show stopper, partly because ESP8266 has a much smaller number of GPIO pins, so I could not afford to spare many GPIO pins to interface with 74HC595; and partly because ESP8266 has only one analog pin, which has to be used for solenoid current sensing, thus cannot be used to detect/enumerate the number of expanders.
This is where I discovered there are a large family of I2C I/O expanders. In fact NXP has a document that nicely summarizes the various choices. Most of them differ by the number of I/O pins available, output type, maximum output current, the availability of pull-up resistors on each pin. The output type is quite interesting: some of them use push-pull (i.e. Totem-poll) which means they can both source and sink a large amount of current (i.e. strong current sources and sinks); some of them (e.g. Quasi-output) can sink a large amount of current but only source a small amount of current (i.e. strong sinks but weak sources); some of them (e.g. open-drain) can only sink current but not source current at all.
Most of the pros and cons below are exactly the counterparts of the cons and pros of 74HC595 respectively.
Pros:
Each pin can be configured as either input or output, so with a single I/O expander chip, some of the pins can be configured as outputs to drive triacs or MOSFETs; while others can be configured as inputs to read sensor values or button statues.
All of them interface with the microcontroller through I2C, therefore they require only the SDA and SCL pins from the microcontroller, and the same two pins can be shared with other I2C devices such as real-time clock, OLED display etc. This is particularly suitable for ESP8266, on which the number of GPIO pins are very limited.
Using I2C almost means the communication is bidirectional — the microcontroller can detect and enumerate the number of I/O expanders connected to it.
Another advantage of I2C is that each I/O expander has a unique I2C address, so by carefully allocating the address of each expander, the microcontroller can detect which type of OpenSprinkler (AC-powered, DC-powered, or Latch) by reading the I2C address.
The I/O pins on these expanders can source or sink a large amount of current (up to 25mA), which is more than sufficient to drive triacs. Well, not all of them though: when designing OpenSprinkler 3.0, I was only aware of PCF8574 and PCF8575, which are weak current sources, so they have to be combined with PNP transistors or P-ch MOSFETs to source a large number of current. By the time I started designing OpenSprinkler 3.1 and 3.2, I became aware of PCA9555 and PCA9535 — they are strong current sources so there is no longer need for additional transistors or MOSFETs.
Upon powering up, the output states are deterministic — in fact, the outputs are always high upon powering up, with weak pull-up resistors. This makes it possible to overcome the flickering issue at powering up.
Cons:
They are relatively expansive (a dollar or so in bulk pricing). While this may not seem much, it does stand out quite significantly when compared to the pricing of 74HC595. Also, the chip shortage caused by the pandemic has made them even more expensive and frequently out of stock. In contrast, it hasn’t affected the pricing or availability of 74HC595 much.
Because each expander must have a unique I2C address, and each chip (e.g. PCA9555) only has 3 bits of address pins, this means you can only connect up to 8 expanders chips. This is also a disadvantage compared to 74HC595 where you can daisy chain virtually unlimited number of expanders. Despite this limitation, I decided this is a worthwhile compromise to make for OpenSprinkler as the total number of zones per controller is usually not that much.
Among all the I2C expander chips, PCF8574/8575/PCA9555/9535 are relatively more common and available. The differences between them are:
PCF8574 has 8 I/O pins, and PCF8575 has 16. Both of them are of Quasi-output type, so they can sink but not source a large amount of current. They were used for OpenSprinkler 3.0 controller and zone expanders.
PCA9555 and PCA9535 both have 16 I/O pins, and both use Totem-poll output, so they can both sink and source a large amount of current. They are used in the current OpenSprinkler 3.2 controller and zone expanders. The only difference between the two is that PCA9555 has built-in pull-up resistor while PCA9535 does not. Thus for any pin configured as input, PCA9535 requires an external pull-up resistor.
CH423s I2C I/O expander
Recently I discovered a very low-cost I2C I/O expander CH423s. It’s made by a Chinese company QinHeng which is famous for making the low-cost USB-serial chip CH340. CH423s has a bulk pricing of about 20 cents, and it has 16 output only pins with 8 additional input/output pins. So it’s a quite capable and versatile chip. However, after reading its datasheet and understanding the sample programs, I found it has a big downside, that is it takes over too many I2C addresses. This is a quite strange design of the chip — unlike PCA9555/PCA9535 (each of which only takes over one I2C address, and you can configure the input/output of each pin by settings configuration registers), CH423s uses multiple I2C addresses to eliminate the need of configuration registers. While it is relatively easy to program, the large span of I2C address space makes it infeasible when the same I2C bus has to be shared with other devices like real-time clock and OLED display, which may conflict with its address space. Also, there are not configuration bits for the I2C address, so it’s not possible to use it on zone expanders. Nonetheless, this is an interesting choice to consider for some applications, if the I2C address space is not a problem.
1-Wire I/O expanders (DS2413/DS2408)
Wouldn’t it be nice if the microcontroller only needs one-pin to communicate with I/O expanders? It turns out such an option does exist! Take a look at the 1-Wire I/O expander chips: DS2413 supports two I/O pins, and DS2408 supports 8 I/O pins. They interface with a microcontroller through a single data wire, hence the name 1-wire. Probably the most well-known 1-wire device is the DS18B20 temperature sensor. While this may not seem a lot of I/O pins, each chip actually has a globally unique address, so you can connect virtually unlimited number of these chips, all sharing a single data line! These chips were brought to my attention by Patrick Morse — he proposed this as a solution to implement Hunter’s EZ Decode system. In fact, before his email, I’ve from time to time received requests to develop a 2-wire decoder system — similar to I2C, 2-wire decoders use a clock line and data line to transfer signals between the microcontroller and the solenoid driver. This is an attractive solution for applications where it’s a hassle to install a large number of long copper wires between the sprinkler controller and each solenoid. 2-wire decoders solve the problem by connecting all solenoid serially using only 2 data lines. Each decoder would have a unique address just like in the case of I2C. The microcontroller sends commands to discover the unique address of each decoder connected on the bus, and consequently can switch each solenoid valve independently. The 1-wire decoder would be a further simplification by reducing one data wire. The commercially available 2-wire decoders generally use proprietary communication protocols that are not open-sourced. The existence of DS2413 and DS2408 means we can easily implement a 1-wire decoder using well-documented 1-wire protocol. That’s great!
Pros:
Using one single data line, suitable for implementing 1-wire decoders that can significantly save the amount of copper wires required in a sprinkler system.
Each chip has a globally unique 1-wire address, making it possible to connect a large number of chips all sharing the same data line. By detecting the 1-wire address, the microcontroller can detect and enumerate each chip.
Cons:
Relatively expensive: DS2413 has a bulk pricing of close to 2 dollars, and it only supports 2 I/O pins. Also they are less commonly used so more prone to chip shortage issues.
While it’s possible to interface with these devices by directly using a microcontroller pin (through the open-source 1-wire library), it may be better to use a 1-wire master chip, which interface with the microcontroller through I2C and it can talk to 1-wire devices using a more robust data line. The 1-wire master chip is particularly useful for ESP8266, which doesn’t have many GPIOs, so it may be necessary to delegate the communication task to a separate chip.
To conclude, this posts summarizes some of the I/O expander options I’ve considered when designing OpenSprinkler circuits, and the pros and cons of each. In the case of OpenSprinkler 3.x, the design decisions were largely driven by the limited number of pins on ESP8266. With other microcontrollers that are not short of GPIO pins, 74HC595 may still be the most attractive choice due to its many advantages and the significantly lower cost.
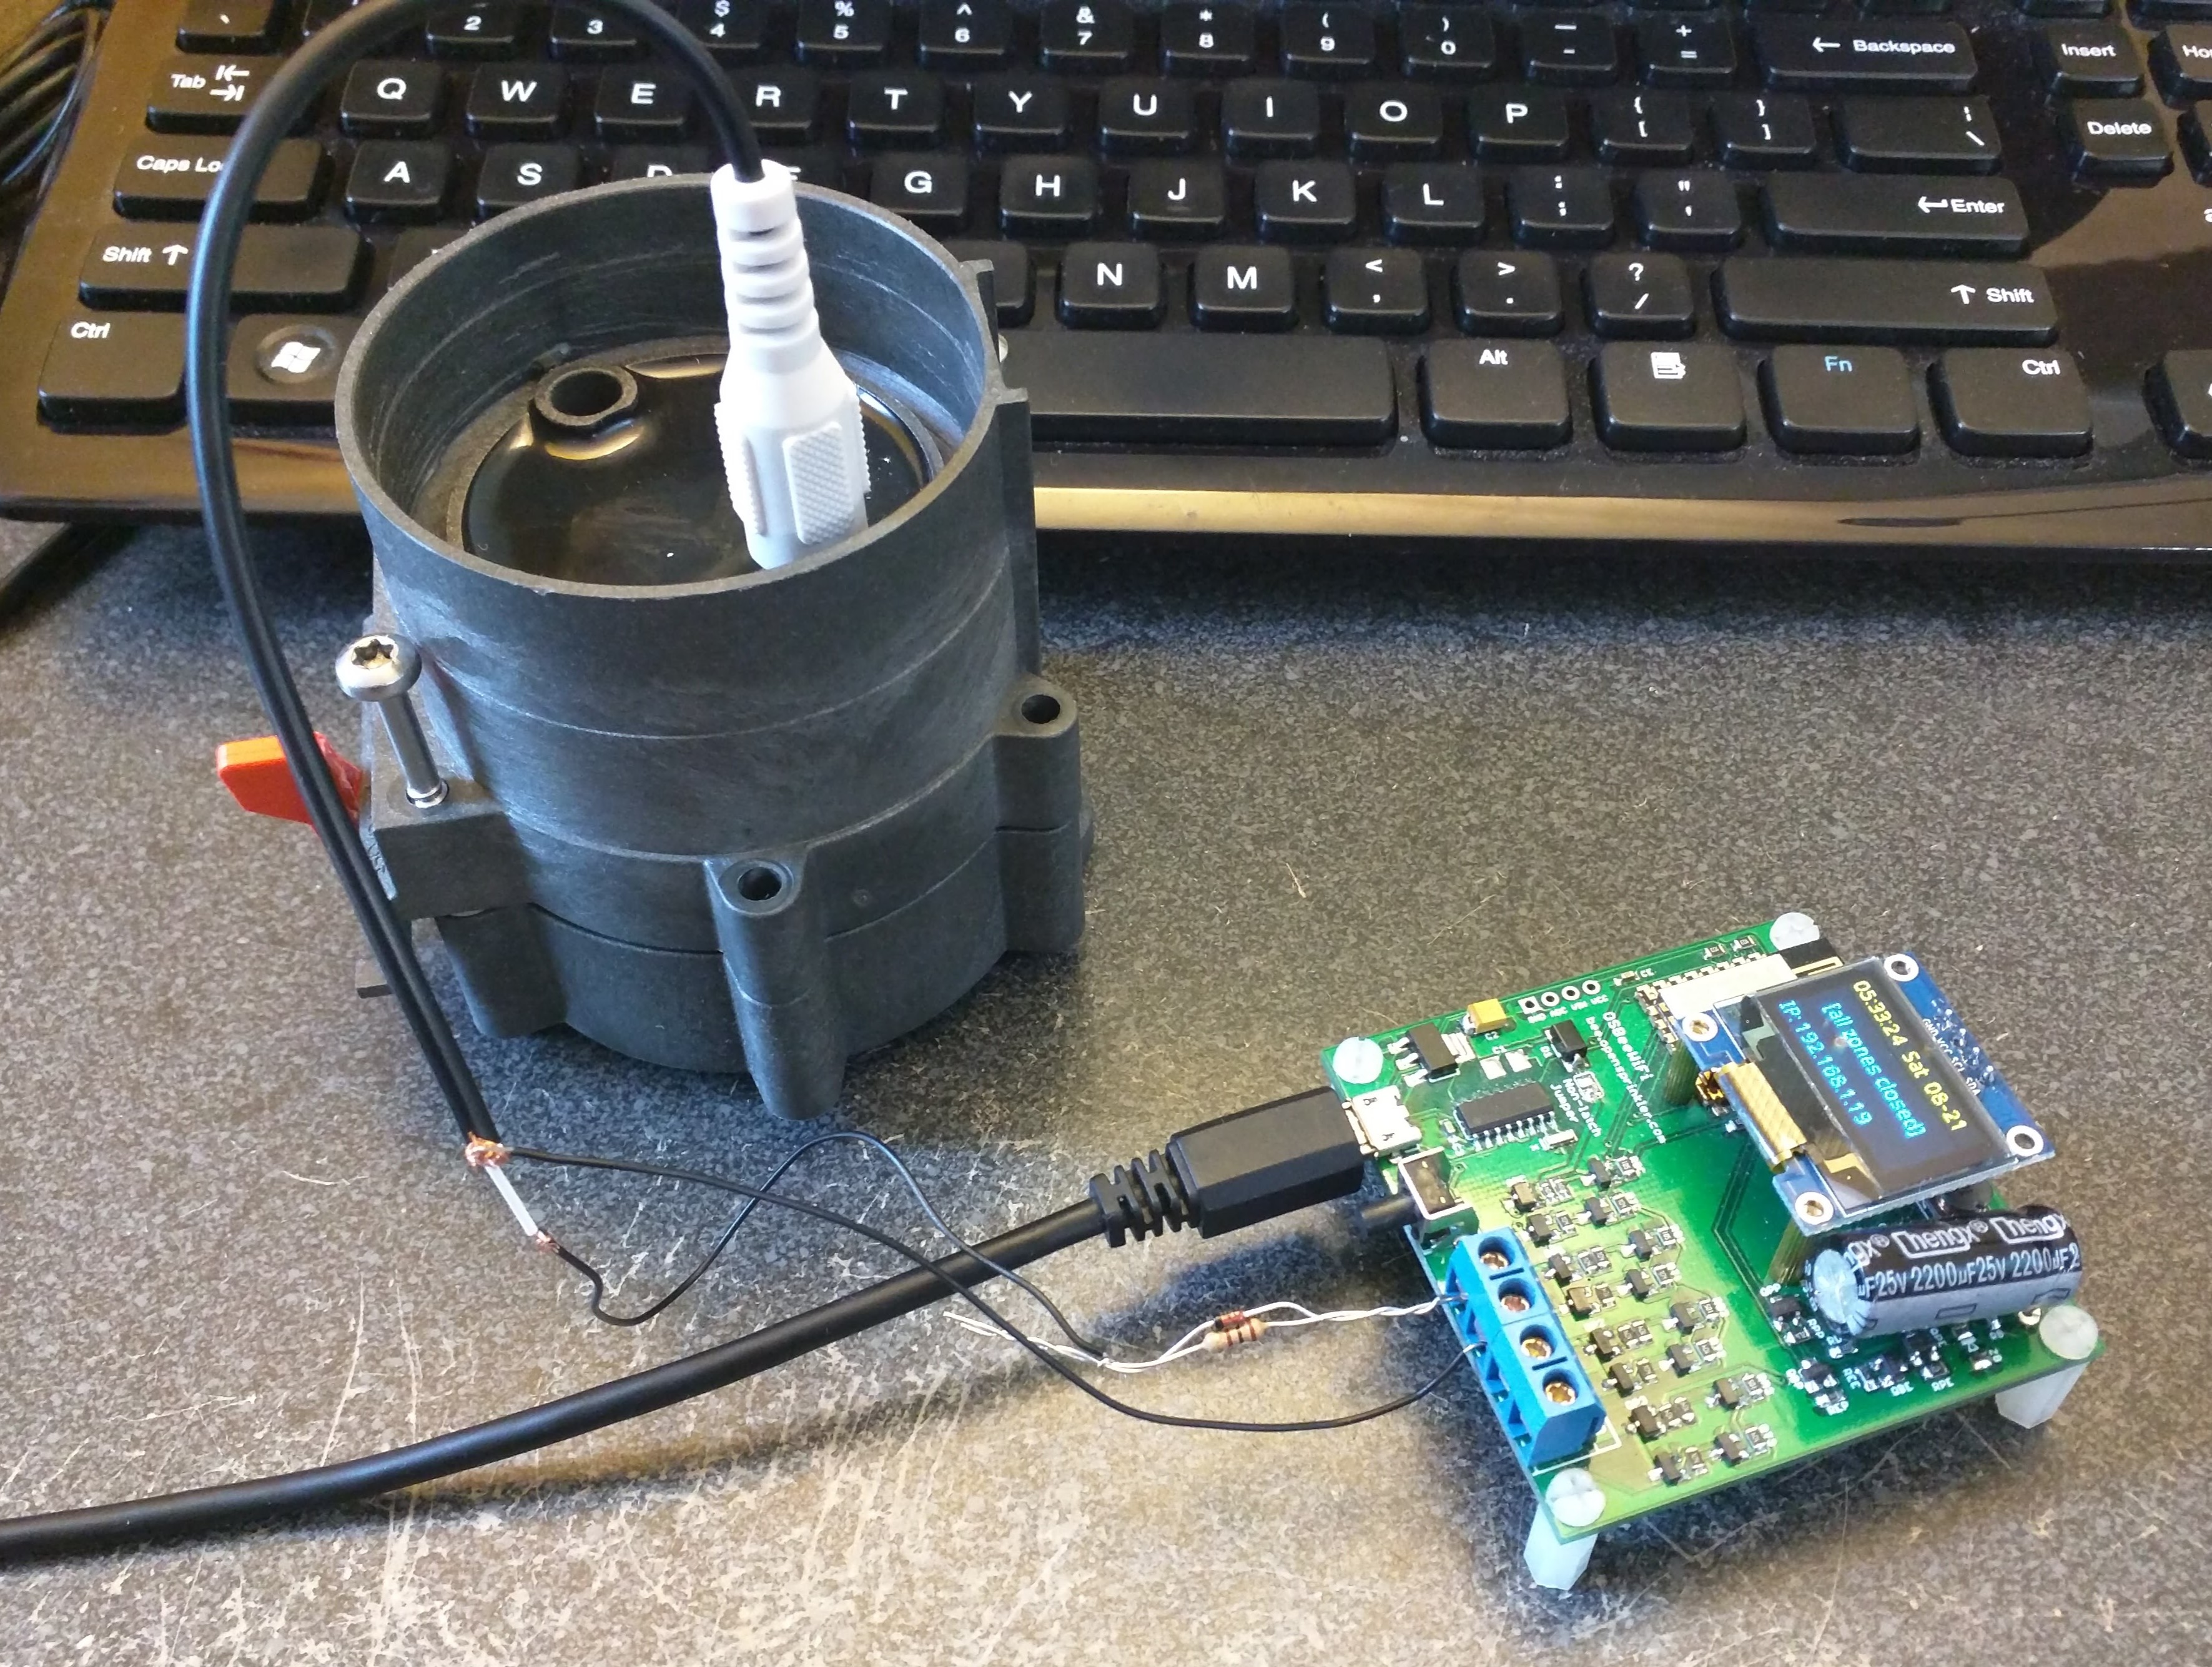
Update: the technique described in this article is possibly no longer necessary for the current version of OSBee, as it now supports setting a different opening vs. closing voltage.
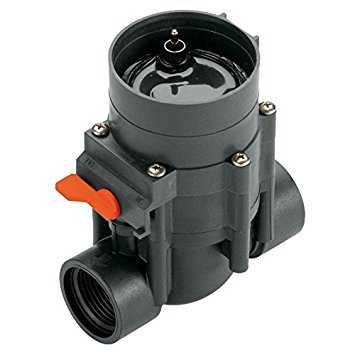
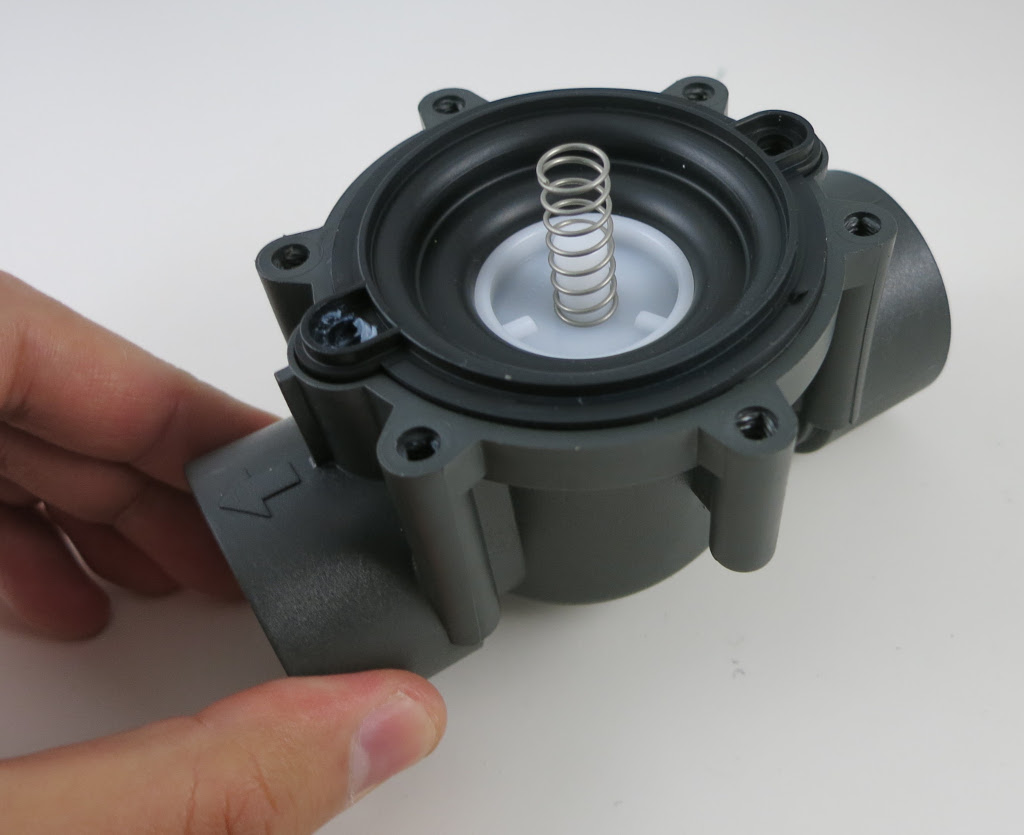
Recently when helping a customer, I came across an interesting case of how to control Gardena 1251 latching solenoid valve using OpenSprinkler Bee. This valve is mostly sold in the European market and isn’t very popular in the US market. On spec, it’s operated using a single 9V battery, and to use this valve you need to buy a Gardena 1250 controller unit. The whole assembly including the valve and controller unit are quite pricy (close to 100 bucks), so it’s not a very cost-effective solution compared to other brands. Nonetheless, it’s an interesting case that helped me understand how these latching solenoids work.
Measure the Control Voltages
The initial request to look into this valve was due to the fact that OSBee can’t seem to operate this valve correctly: it can open the valve but never manages to close the valve. This was reported by a German customer, and it caught my curiosity. To figure out the issue, the first thing I did was to check how the control unit (1250) is sending out control voltages to the valve. It’s pretty common that when operating latching solenoid valves, the control circuit sends an impulse voltage to open the valve, and another impulse voltage in the reverse polarity to close the valve. On most solenoid valves I’ve seen, the two impulse voltage (of opposite polarity) are roughly the same, and that’s also how the OSBee circuit works.
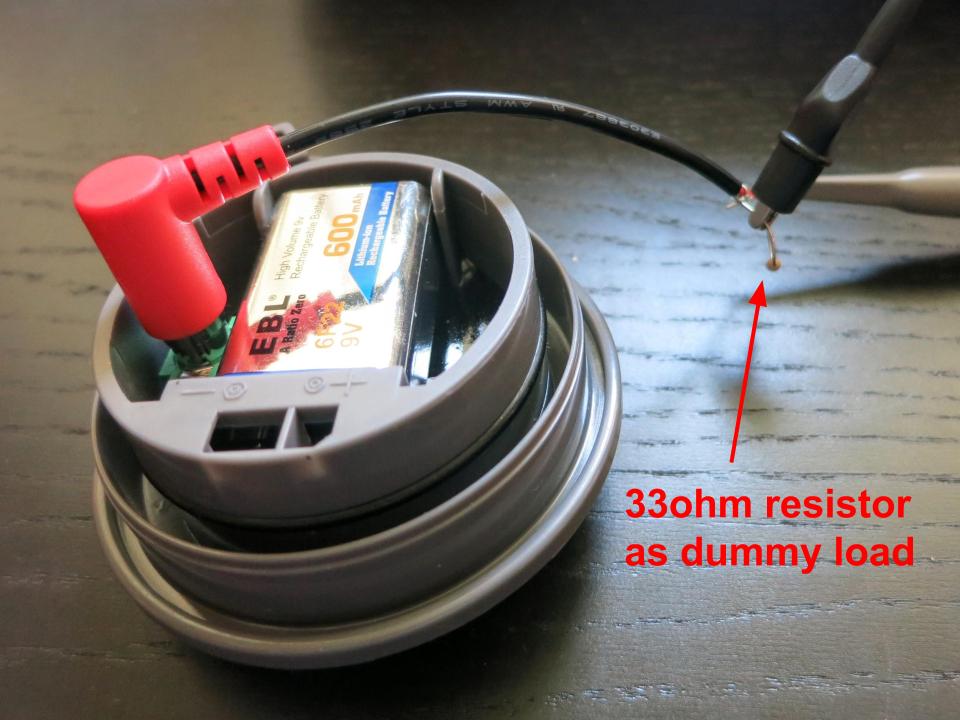
Upon connecting the control unit to an oscilloscope, I noticed something strange: no matter how I press the on/off button, it’s only sending a very short (a few milliseconds) pulse, which cannot possibly operate the valve. Then it became clear to me that the controller is in fact actively sensing the existence of the valve, and would not send control voltages if the valve is not detected. I measured the resistance of the solenoid valve, which is about 35 ohm. So I connected a 33 ohm resistor to the controller as a dummy load, and there you go, now we can observe the control voltages and pulse lengths.
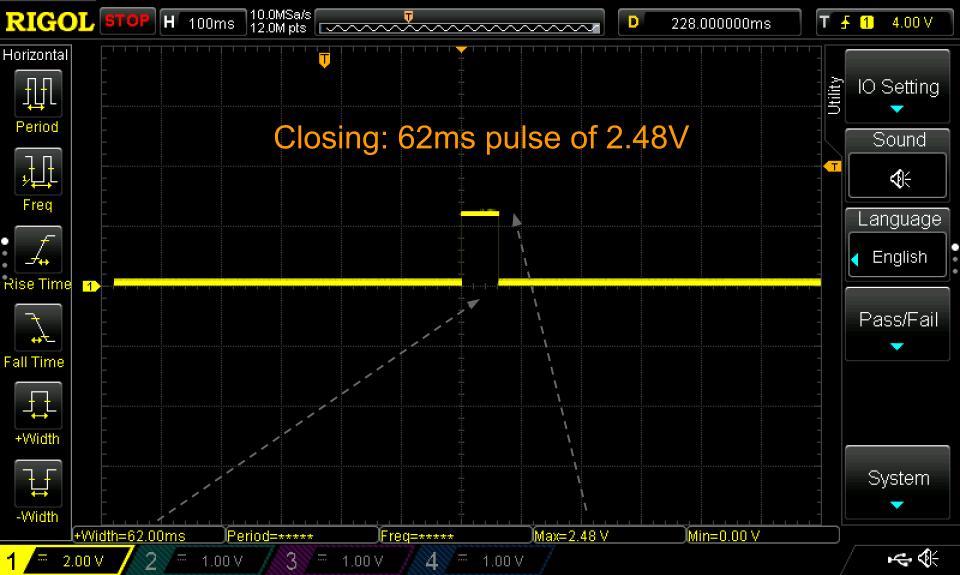
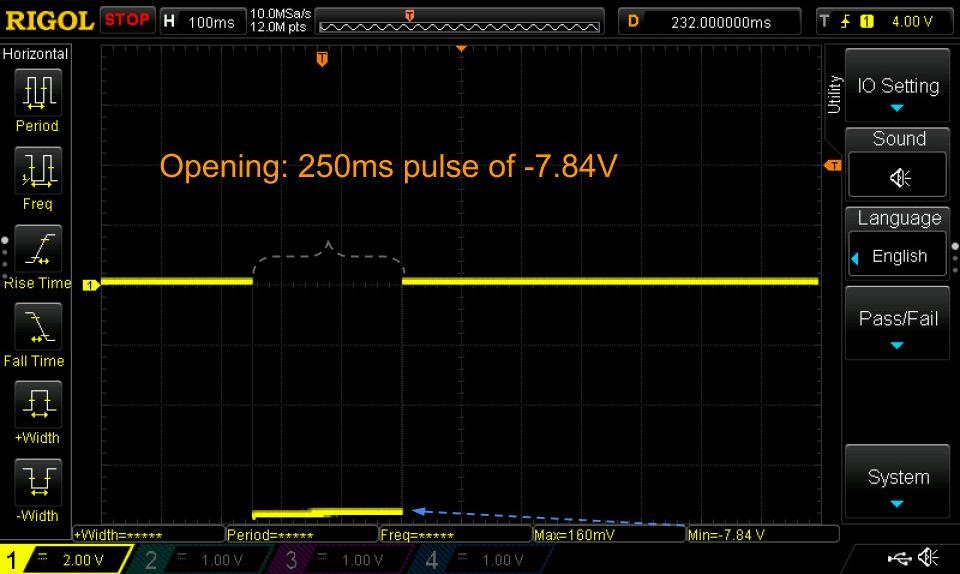
It’s pretty easy to notice the asymmetry here: while opening the valve requires a pulse of 250 ms and -7.84 voltage (this is roughly the battery voltage since my 9V battery isn’t fully charged), closing the valve only requires a very short pulse of 62 ms and very low voltage — 2.5V. This is quite strange to me: how come closing the valve only requires such a short pulse and such low voltage?
How Does This Latching Valve Work?
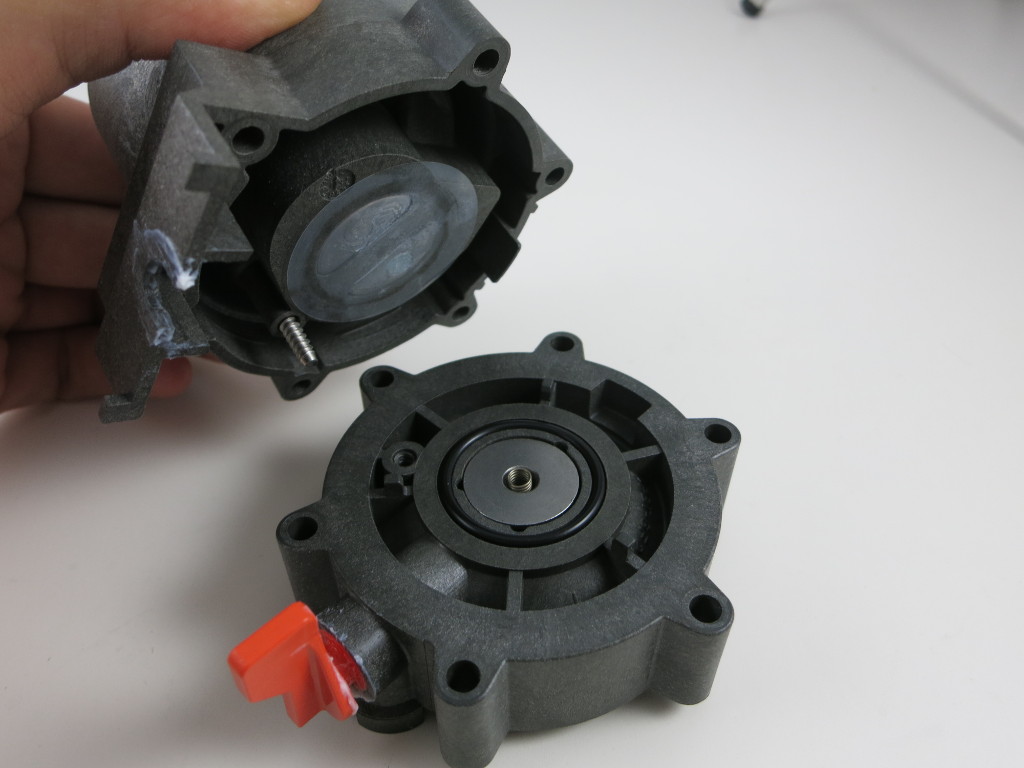
In order to figure out what’s going on here, I un-tightened a bunch of screws and opened up the valve.
At the bottom of the valve is a pressure chamber with a spring. This is very similar to other valves I’ve seen.
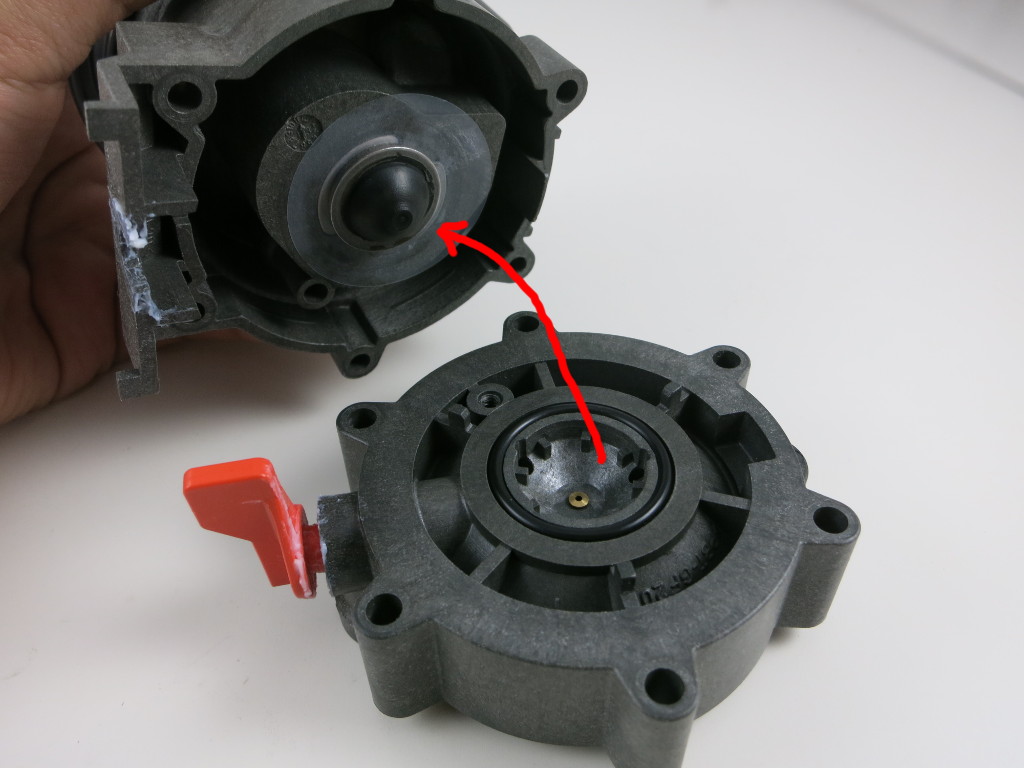
The top section contains, supposedly, a coil and magnet inside, and a small cone-shaped metal piece that can be attracted to the magnet or released. It’s quite easy to observe that when opening the valve, the metal piece gets attracted (left picture above), this supposedly releases the pressure in the bottom chamber, thus allowing the water to flow through the valve. Conversely, when closing the valve, the metal piece is released and dropped to block the hole at the bottom, this supposedly allows water pressure to build up in the bottom chamber, thus stopping the water flow.
The key in making this latching is that an impulse voltage can permanently magnetize the core, thus permanently attracting the metal piece. This makes it possible for the valve to remain in the ‘open’ status without contiguously drawing current from the power source (which is unlike non-latching valves like 24VAC valves).
Observing this mechanism, it became clear to me that ‘closing’ the valve basically requires de-magnetizing the core, and that requires just a short pulse of low voltage in the opposite polarity. If you apply the same voltage and strength as before, it will start magnetizing the core the other way, thus the magnetic pole changes direction but the metal piece will still be permanently attracted!
Anyways, this is very interesting to me because previously I had no idea how latching solenoid valves work internally. Now at least I know understand this particular valve works, and this understanding will help me figure out how to get OpenSprinkler Bee to control this valve.
Use OSBee to Control the Gardena 1251 Valve
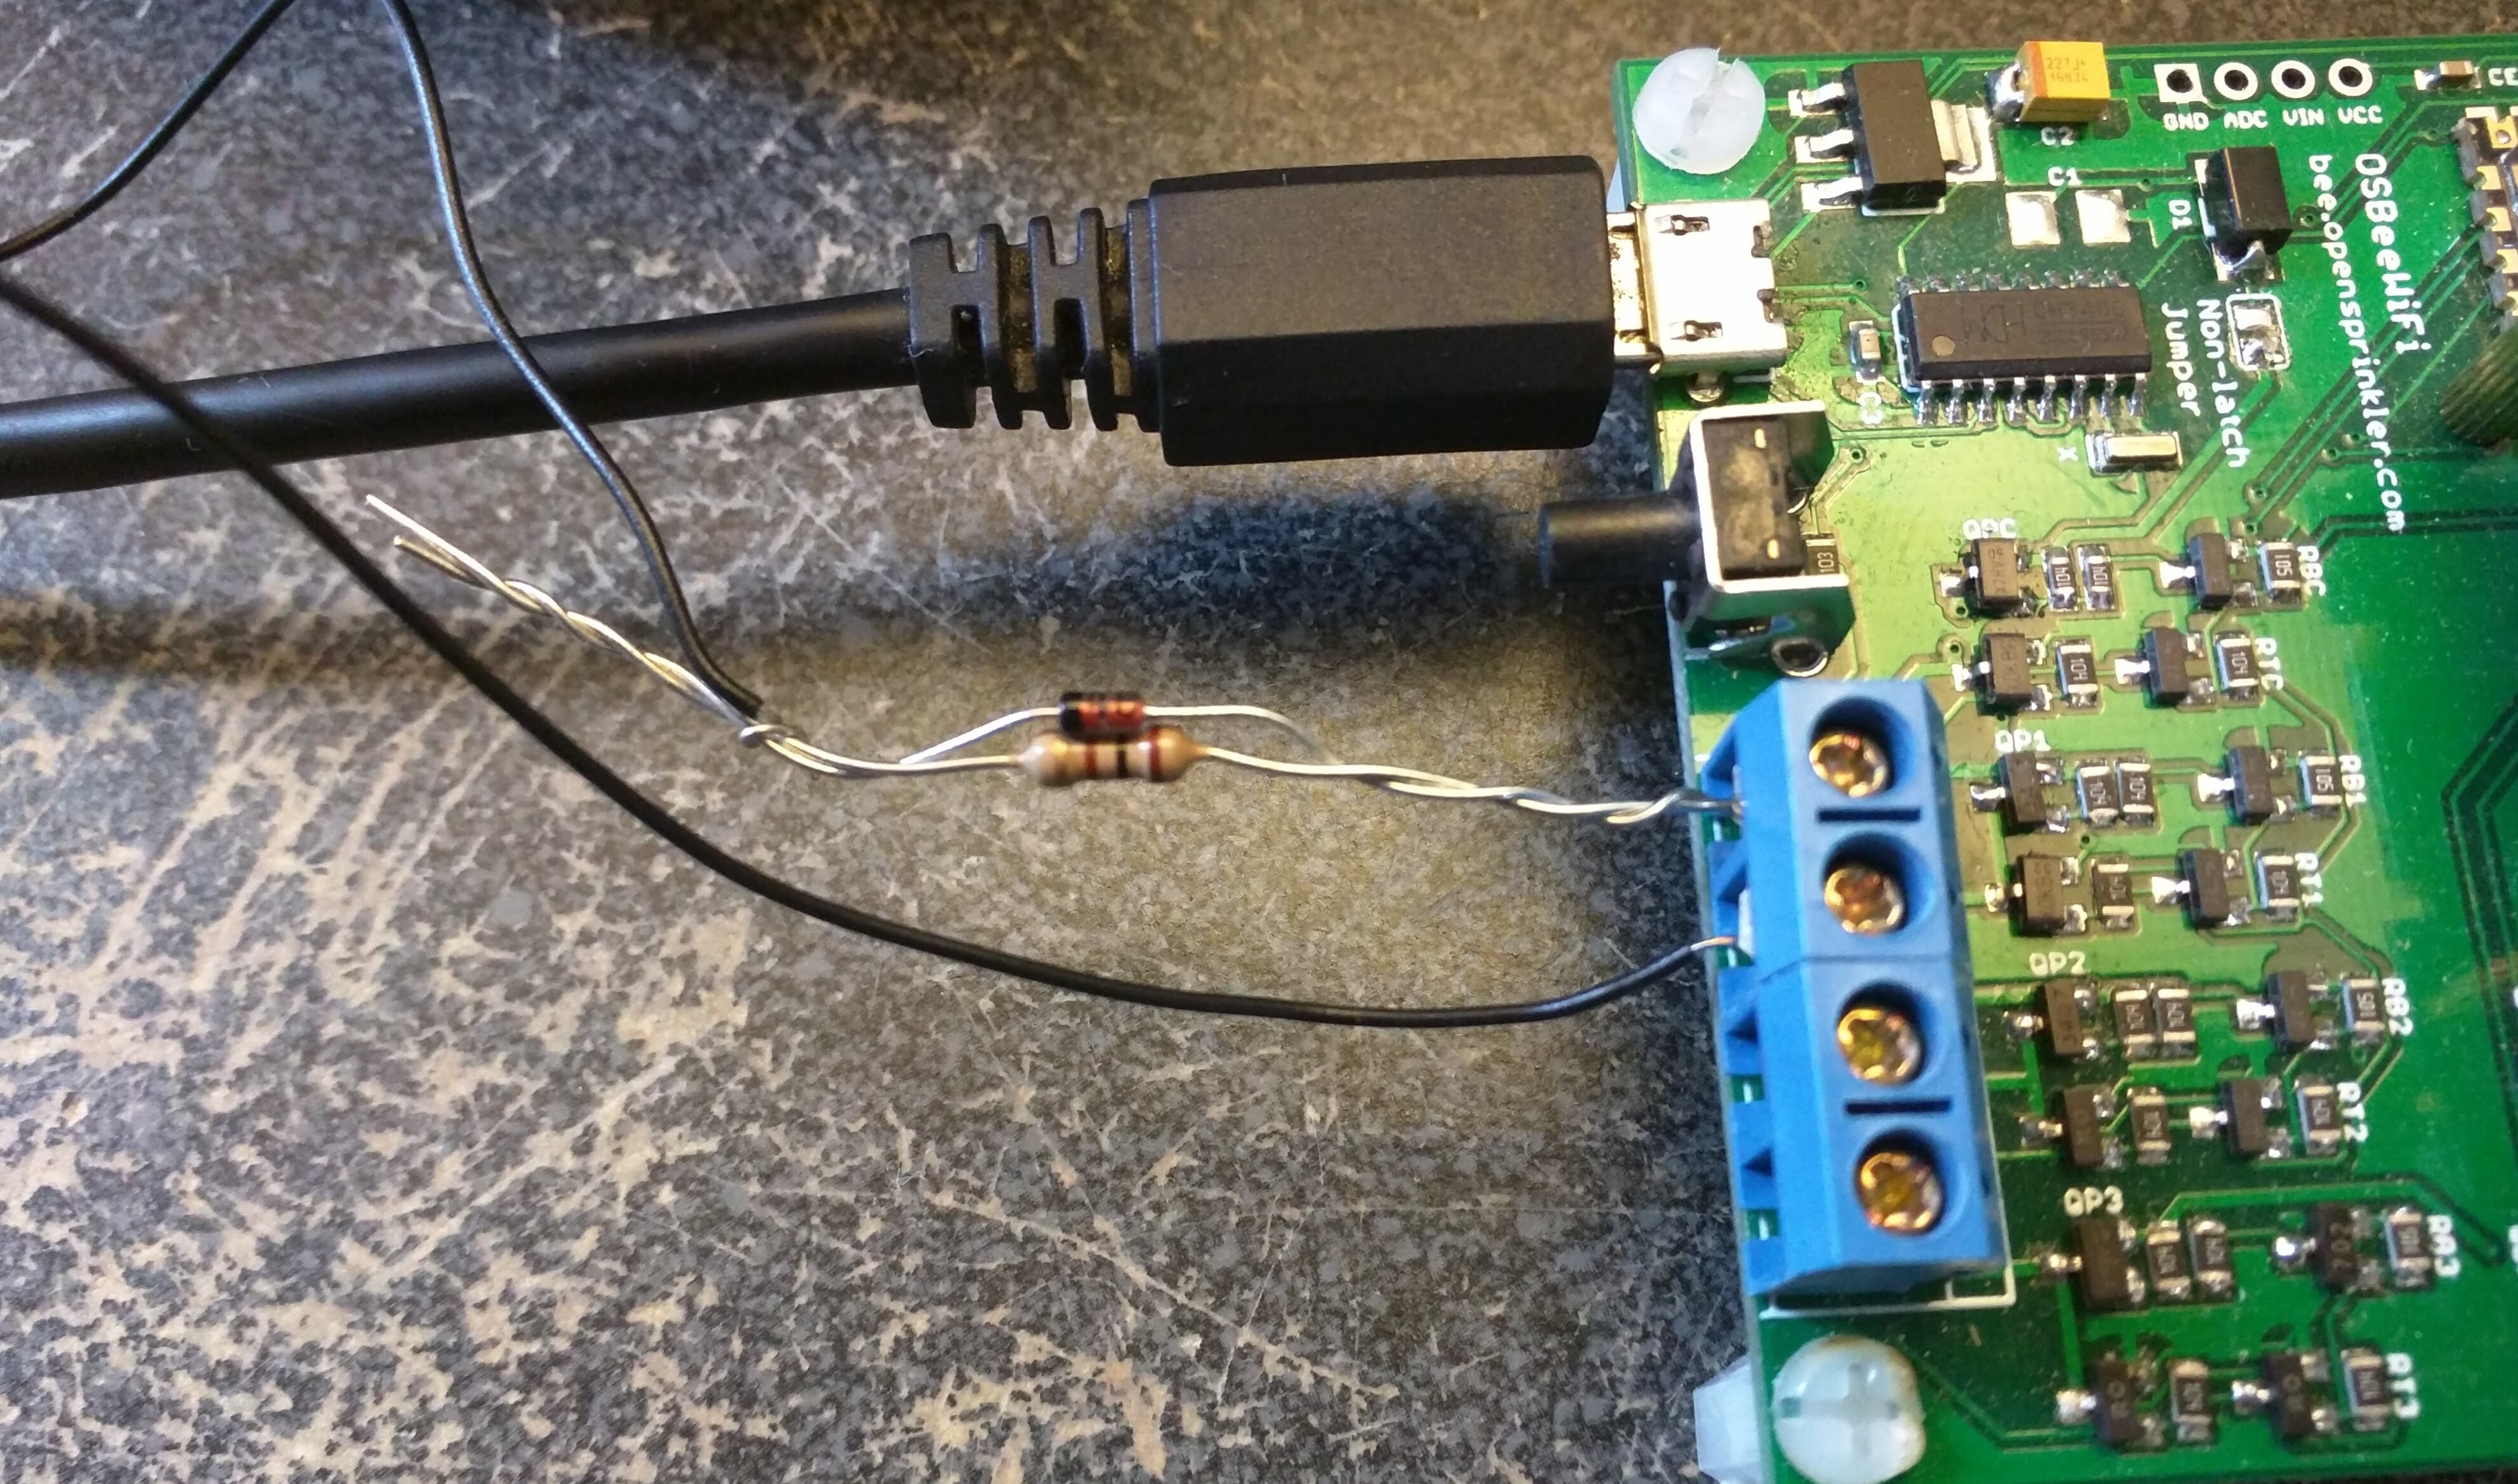
There are several issues that make OSBee incompatible with the Gardena 1251 valve, but it turns out they can all be solved without too much difficulties. The first is that OSBee by default boost the input voltage (which is 5V from USB) up to 22VDC, which is significantly higher than 9V required by the valve. This is reasonably easy to solve — by fine tuning the boosting time, I can find the sweet spot where the boosted voltage is just around 9V. This boosting time turns out to be around 80 to 100ms.
Second, OSBee by default uses 100ms pulse in both directions (i.e. both opening and closing the valve). This is very easy to change to 250ms and 62ms respectively to match the Gardena controller.
The last issue deserves more thinking, that is, opening the valve requires 9V, but closing the valve requires only 2.5V. Because the input voltage is from USB and it’s 5V, there is no obvious way to step that down to 2.5V since the boost converter can only bump up the voltage and never reduce the voltage. How do we create this asymmetric voltage in opposite polarities? Turns out that you can do so by making use of a diode connected in parallel with a 100 ohm resistor. Why? The diode is a one-way gate: when positively biased, it turns on almost fully (except the 0.7V voltage drop across it, which can be ignored here); but when reversely biased, it turns off, thus current has to flow through the resistor (connected in parallel to the diode), and that resistor will divide the voltage, ensuring that only about 2.5V falls on the valve.
I’ve attached here a diagram showing the connection. The diode can be almost any general-purpose rectifier, like 1N4148, 1N4001 and so on. I’ve also included two photos showing the actual components connected to OSBee and the valve. With this modification, OSBee can now both open and close the Gardena 1251 valve successfully. Mission accomplished!
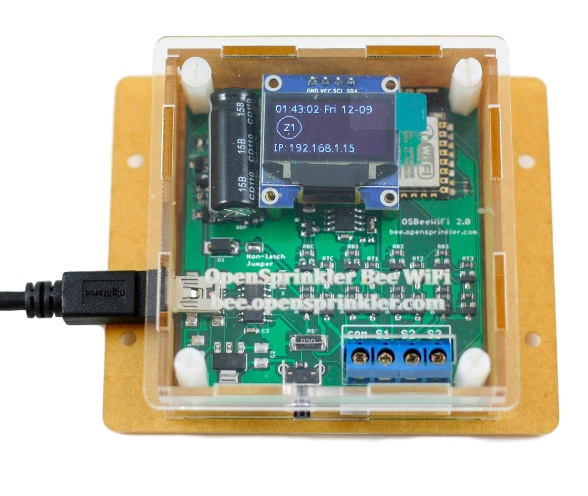
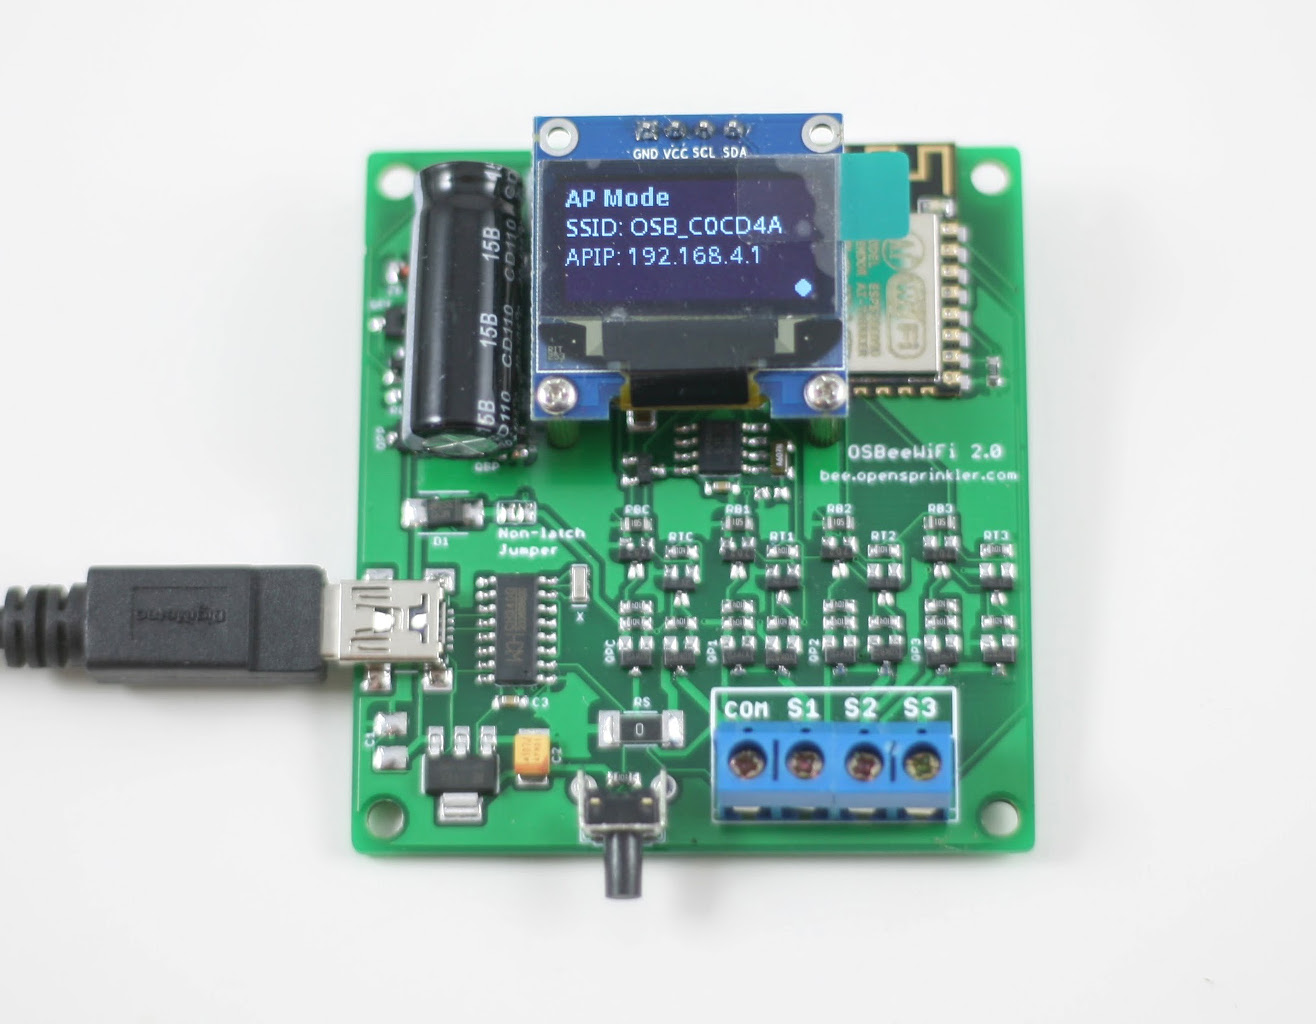
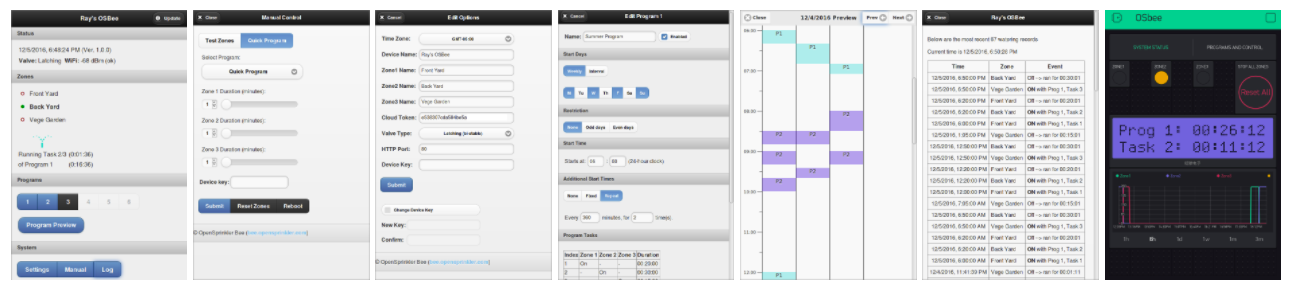
Today I am very excited to introduce OpenSprinkler Bee (OSBee) 2.0: it’s an open-source, WiFi-enabled, universal sprinkler controller. It is suitable for garden and lawn watering, plant and flower irrigation, hydroponics, and other types of watering project. This is the first OpenSprinkler product built upon the popular ESP8266 WiFi chip. It’s designed primarily for latching solenoid valves, but can also switch non-latching solenoid valves (such as standard 24VAC valves), low-voltage fish tank pumps (which can be used to feed water to flower pots and indoor plants), and other types of low-voltage DC valves and pumps. All of them can be powered from a single USB port. This is made possible by using a unique circuit design that leverages a boost regulator and a new solenoid driver circuit. Hence I call it a Universal sprinkler controller. Among the software features, it introduces the concept of Program Tasks, which provides maximal flexibility in programming the zones. In contrast to the first version of OSBee, which was in the form of an Arduino shield and relies on an additional Arduino, OSBee 2.0 is a standalone controller with built-in WiFi, OLED display, laser cut acrylic enclosure, and can switch up to 3 zones independently.
Here is not-so-short video introduction to OSBee 2.0:
Here are two photos of the OSBee 2.0 circuit board:
Screenshots of the web interface and Blynk app:
In summary, in terms of Hardware Design, it has the following features:
A single ESP8266 chip serves as the microcontroller and handles WiFi connectivity.
On-board 128×64 OLED display, real-time clock with backup battery, USB-serial chip. Can switch up to 3 zones independently.
Boost converter and a new H-bridge design that allows the same controller to switch both lathing and non-latching solenoid valves, all powered from a single 5V USB port.
An easy-to-assemble laser cut acrylic enclosure.
In terms of Software Features:
It has a built-in web interface that allows you to easily change settings, perform manual control, and create automatic sprinkler programs. It also provides logging and program preview features.
It introduces Program Tasks to allow maximal flexibility in programming zones. For example, you can define arbitrary ordering of zones, have multiple zones run at the same time, and insert delays between tasks. Zone water time is programmed at precision of seconds.
It allows remote control through the Blynk app and Blynk cloud server.
Firmware update can be performed either wirelessly using the web interface (OTA), or through the on-board USB port with a USB cable.
It improves upon the current OpenSprinkler 2.3 by adding built-in WiFi capability, and using a unified solenoid driver that can handle both latching and non-latching solenoid valves. On the other hand, it can only switch up to 3 zones, and the number cannot be expanded. It’s also missing a few advanced features at the moment, such as weather-based water time, virtual stations (e.g. HTTP and RF stations), and support for sensors. Some of these features are purely software, and can be easily added in the future.
OpenSprinkler Bee 2.0 is now available for purchase at our online store:
The package includes a fully assembled OSBee 2.0 circuit board, laser cut acrylic enclosure, instructions, USB cable, and optionally an USB adapter.
Resources and Technical Details
OSBee 2.0 is an open-source project. Its hardware schematic, firmware source code, user manual, and API document are all available at the OpenSprinkler Github repository (look for the prefix OSBee in the repository).
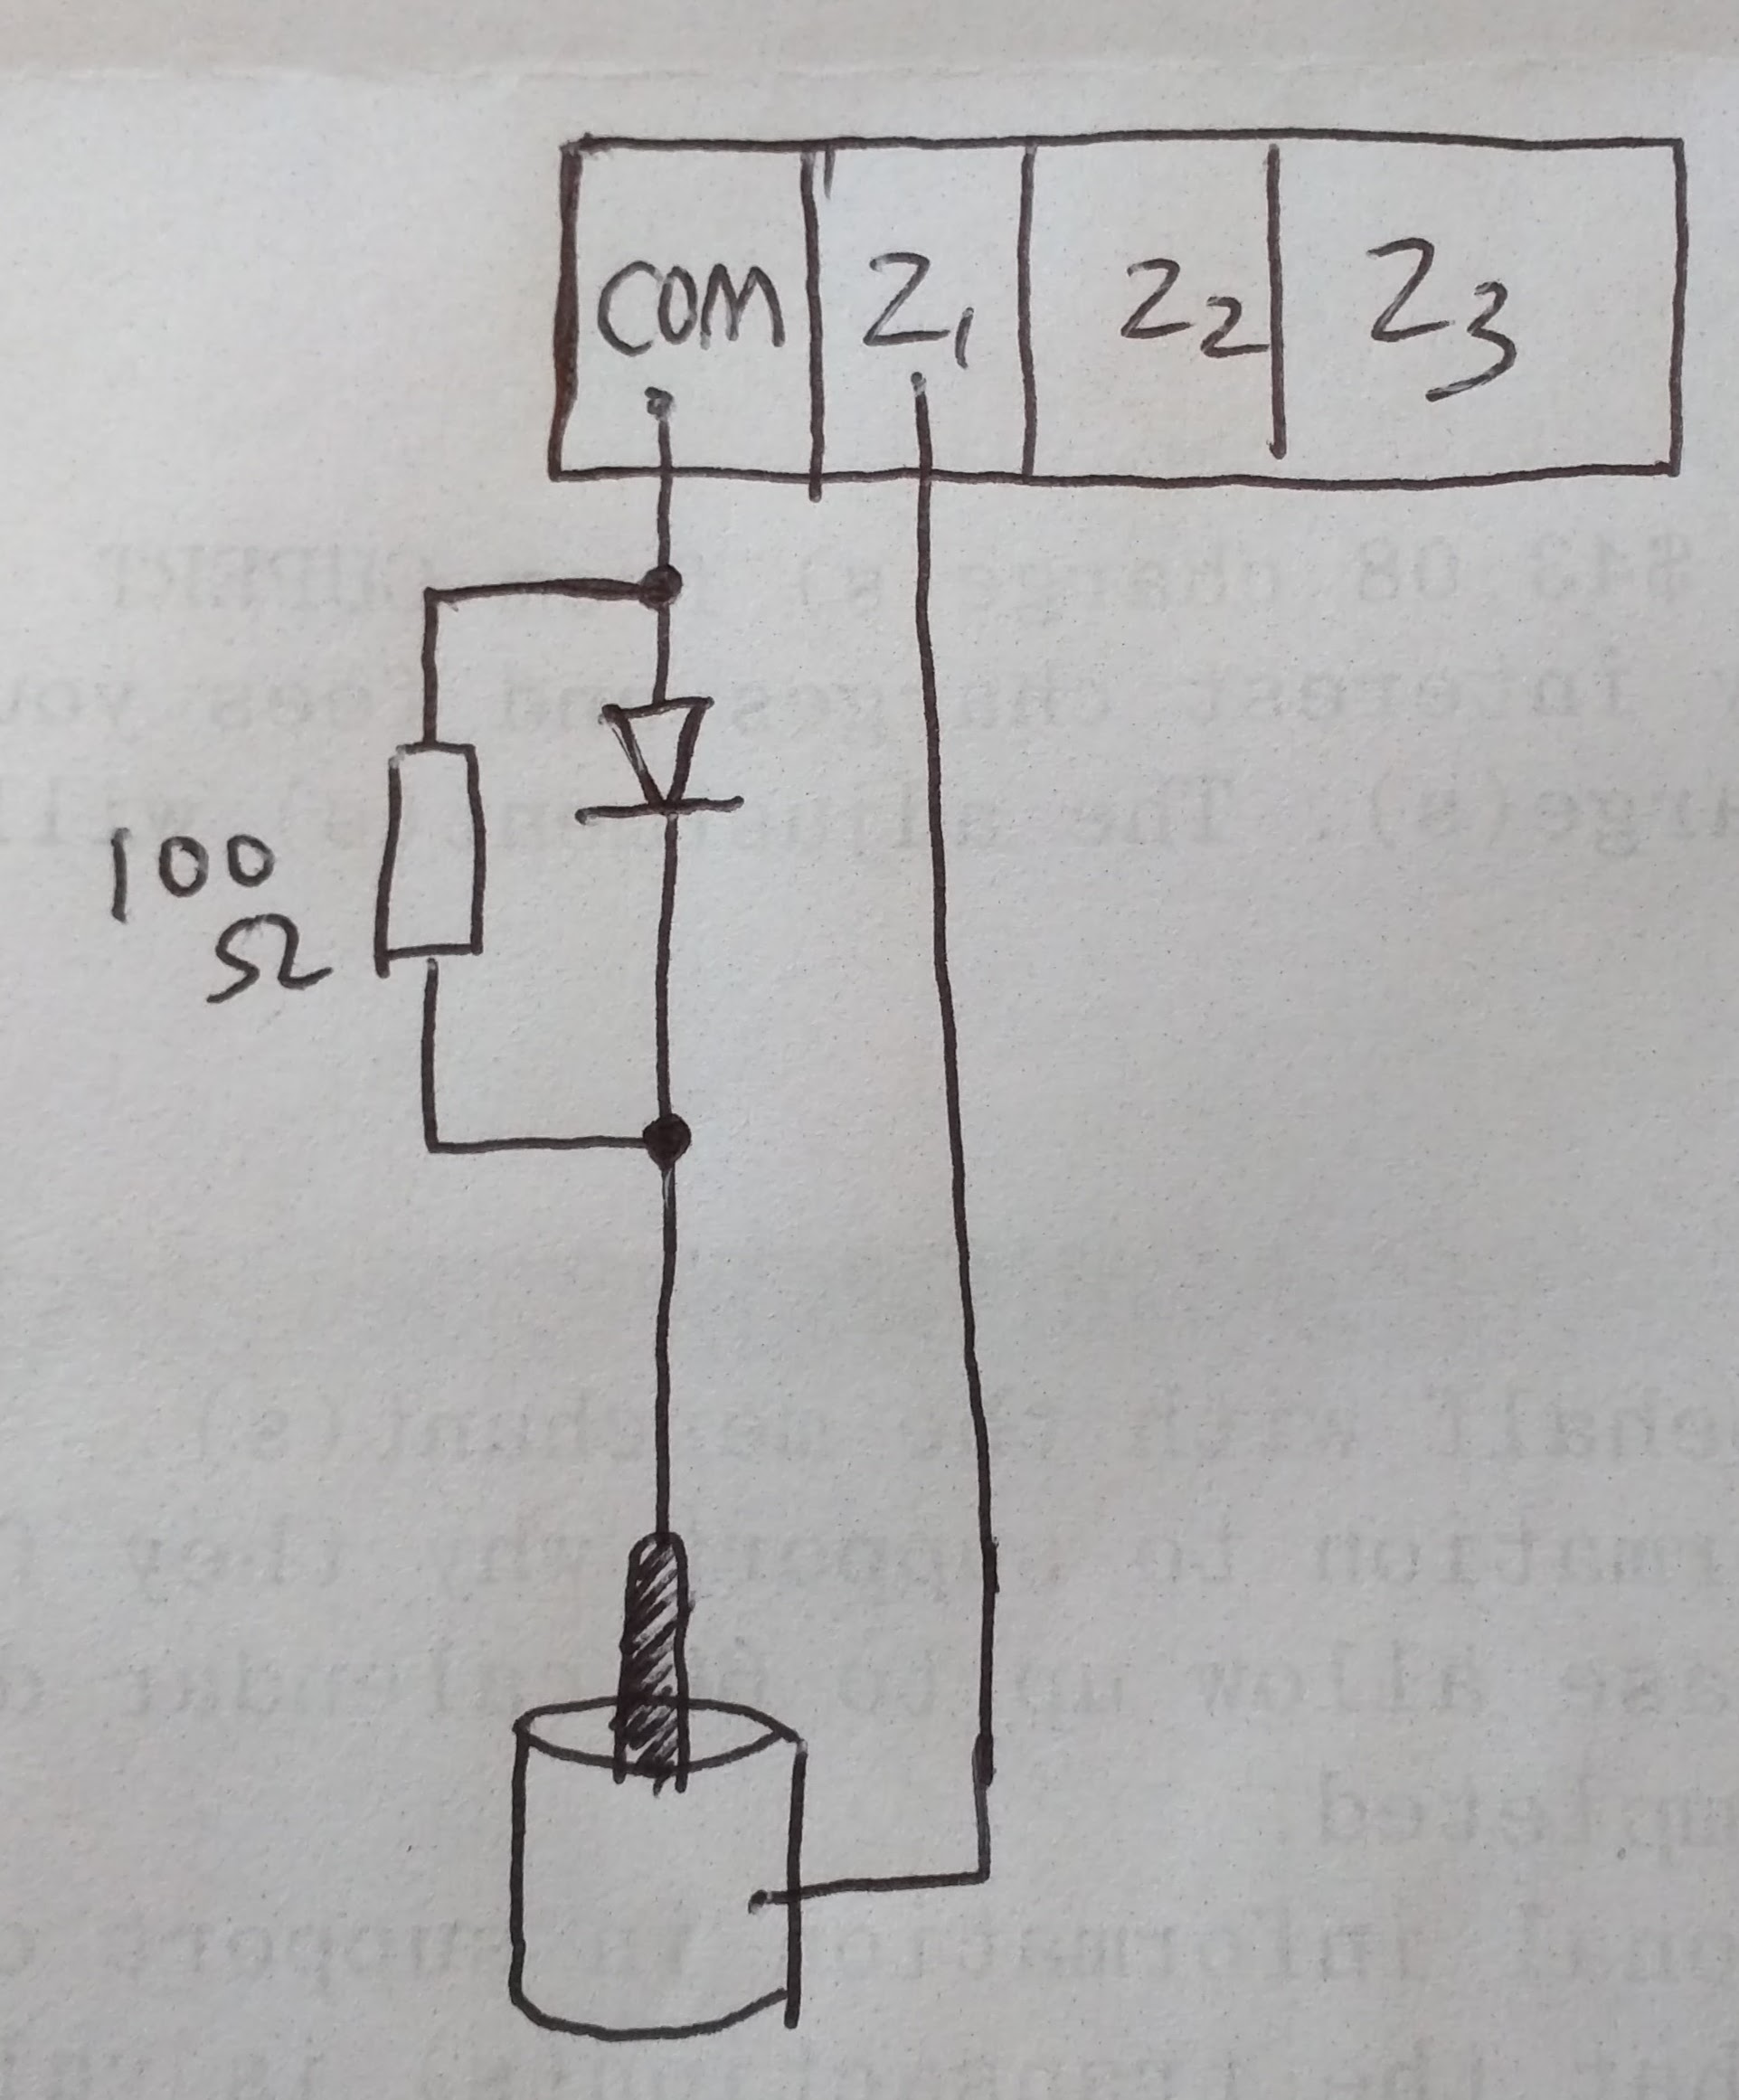
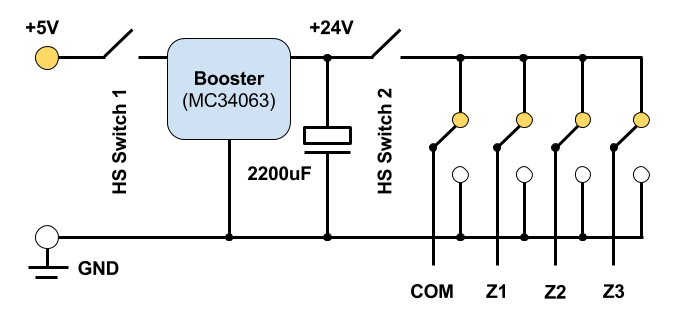
Below I will briefly go over the technical details of the boost converter and the solenoid driver, as I think it’s an interesting design that’s potentially applicable elsewhere. The boost converter is borrowed directly from the OpenSprinkler DC circuit. It’s a simple MC34063-based boost regulator that bumps the input 5V up to 24V DC, and stores the charge into a 2200uF capacitor.
The Booster is controlled by two MOSFET-based high-side switches. The first one controls the input power: the microcontroller uses it to feed the input 5V to the booster, which quickly raises the voltage to 24V. After a couple of seconds, high-side switch 1 is turned off and the microcontroller prepares the states of the half H-bridges (COM, Z1, Z2, Z3). Let me first explain how the states are set for Latching solenoids. The solenoids for the three zone are connected between COM-Z1, COM-Z2, and COM-Z3 respectively. Normally all four half bridges are in ‘High’ state, so the net voltage across every solenoid is 0. To activate a solenoid (say Z1), the corresponding half-bridge will be pulled down to ground (i.e. ‘Low’ state). The microcontroller then turns on high-side switch 2 momentarily to dump the charge from the 2200uF capacitor to the solenoid. This turns on the valve. To deactivate the solenoid, the microcontroller pulls all half-bridges to Low, except the zone that is to be deactivated which remains in High state. It then turns on high-side switch 2 momentarily, again dumping the capacitor charge to the solenoid, but now in reverse polarity, thus closing the valve. This is basically how it operates latching solenoids.
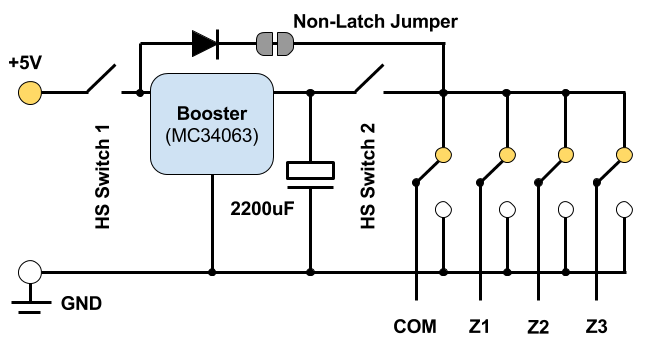
So how does the same circuit work for Non-Latching Solenoids, such as 24VAC valve commonly used in residential sprinkler system? It turns out that just like latching solenoids, non-latching ones also require a pretty high impulse current (called inrush current) to get activated. The difference, however, is that to keep it on, it needs to draw current continuously from the power source. When the power cuts off, the solenoid is deactivated. This is called the holding current and is considerably lower than the inrush current. So to operate non-latching solenoids, all I need is an additional diode that provides a path from the input 5V to the solenoids to provide the holding current. This diode could be software switched by the microcontroller, but because ESP8266 has very few number of GPIO pins, (and I want to avoid having to use an IO expander), I opted to enable this diode path using a solder jumper. To operate non-latching valves, this jumper needs to be soldered on.
On the Software side, the firmware uses an option to allow the user to choose the valve type (unfortunately the controller can’t automatically detect the valve type yet). For non-latching valves, the half-bridge states are actually easier to manage than the latching case: now COM is always in ‘High’ state, and Z1, Z2 or Z3 are kept ‘Low’ for as long as needed to keep the valves on. That’s it.
You may be wondering how does this even work for valves rated at 24VAC? How can we drive them using DC, and just 5V? The short answer is that this is due to the way such solenoids behave under AC. Specifically, when you first connect the solenoid to 24VAC, it immediately draws a high inrush current, which reliably energizes the solenoid and opens the valve. Once energized, the solenoid presents a large inductance and high reactance to AC, thus limiting the effective current flowing through it. This results in lower holding current, which is enough to keep it on and saves the coil’s lifespan. We can exploit this behavior and achieve the same effect using a DC-based circuit: the booster produces a high voltage initially to provide the inrush current needed to energize the solenoid, and then lowers the voltage to the input level to provide the holding current. Exactly how much holding current is needed is not clearly defined, but for all 24VAC solenoids I’ve tested, once energized, they can remain on at just 5V input voltage.
Now we are left with the last part of the technical details: the Half H-Bridge Design. From the circuit diagram above, it seems we can easily implement the half bridges using relays. While this is totally true, relays are bulky, expensive, slow to switch, and difficult to replace. For these reasons, modern electronics prefer to use semi-conductors as much as possible in place of relays. So I decided to use a MOSFET-based H-Bridge design, and it’s a more interesting design than just throwing relays everywhere.
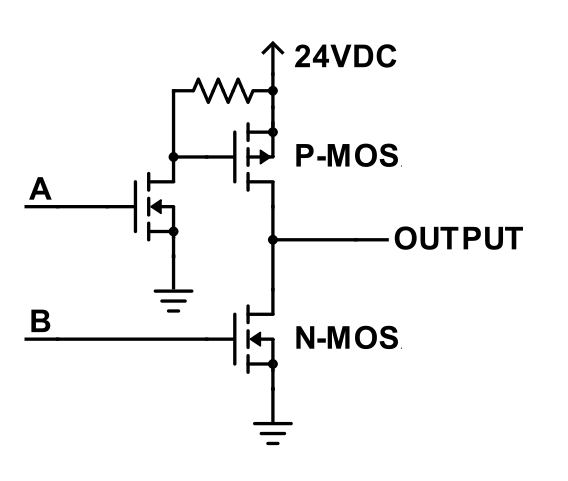
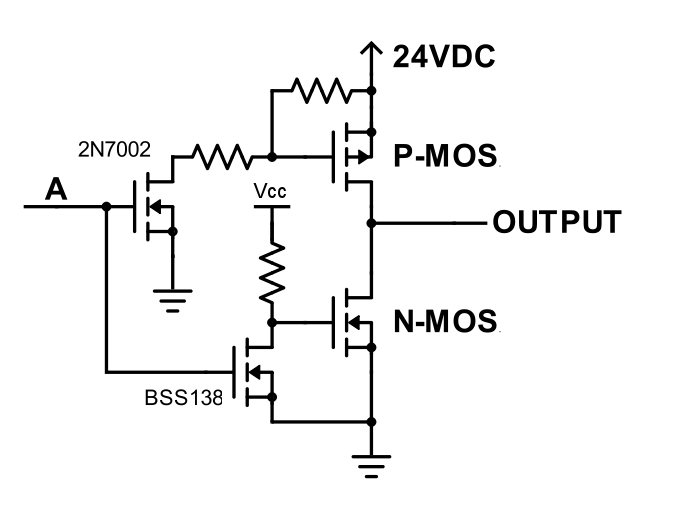
Typically when you want to switch between GND and a voltage considerably higher than the microcontroller’s output, you can use a half H-bridge design as show in the left image below. It uses a low-power N-MOSFET to drive the high-power P-MOS on the bridge, making it possible to use a GPIO pin to switch a high voltage. However, this generally requires 2 GPIO pins (i.e. A and B) per half bridge. Because ESP8266 has a small number of GPIO pins, the challenge is how to use just 1 GPIO pin per half bridge.
So I came up with a slightly modified half bridge design, as shown in the right image above. It leverages two low-power N-MOSFETs to drive the high-power P-MOS and N-MOS on the bridge. This allows using just 1 GPIO pin (A) to switch the bridge. When A is Low, both input N-MOSFETs turn off, and the gates of the P-MOS and N-MOS are both pulled high, so the P-MOS turns off and N-MOS conducts, pulling the OUTPUT to Low. When A is High, the reverse happens, and the OUTPUT is also High.
Using two input N-MOSFETs also makes it easy to prevent shoot-through problem, which is often an issue with H-bridge. Shoot-through happens when the control signal A transitions from Low to High (or conversely from High to Low), and at some point the P-MOS and N-MOS may both be in conducting state, causing a shorting. To avoid this, I chose to use two different types of input N-MOSFETs: one with lower gate threshold voltage (such as BSS138) and one with higher gate threshold voltage (such as 2N7002). This way, as the control signal A swings between Low and High, the two input N-MOSFETs will turn on and off at different times, ensuring that the P-MOS and N-MOS will not both conduct at the same time. As for the choices of the P-MOS and N-MOS, I opted to use the common AO3401 and AO3400, which provide ample room for continuous current as well as impulse current.
Sorry about going through these nitty-gritty details, but I think these are interesting design notes worth documenting and sharing. Feel free to chime in with your comments and suggestions. Thanks!
A quick note that our Black Friday / Cyber Monday sales are on now: all OpenSprinkler products are shown in discounted prices right now, and the deal only lasts till Monday Nov 28. This is the only time of the year that we offer discounted pricing, so if you are interested in buying OpenSprinkler, grasp this chance and don’t let it slip away!
If you are wondering whether you need to apply any coupon code. The answer is NO: the price you see is the discounted price. In the past when we used to have coupons, many customers forgot to apply the coupon in the end. To save you the trouble of having to enter coupon code, we directly discount the price, so you will definitely not miss it.
I just discovered something exciting recently and want to share with you: it’s now possible to use IFTTT with OpenSprinkler and OpenGarage; and because IFTTT support Amazon Echo (Alexa), you can now speak voice command to trigger sprinkler actions. For example, say ‘Alexa, trigger open sprinkler zone 1‘, or ‘Alexa, trigger my garage door‘. I will briefly walk you through the setup process. We will be building support for IFTTT into the firmware soon, to allow for additional features like push notification. For now, the guide below will allow you to trigger actions on OpenSprinkler and OpenGarage with your existing firmware.
Before I proceed, I should give credits to Mike Szelong, who has purchased both OpenSprinkler and OpenGarage, and made both work with Alexa through IFTTT. Thanks to Mike for sending me this tip in the first place. Below let me first explain how IFTTT works.
What is IFTTT?
If you’ve never heard of IFTTT, it stands for If This Then That. With IFTTT, you can set up what’s called ‘recipes’, which hook up ‘triggers’ with ‘actions’. There are many triggers, for example, weather changes, sensor value changes, a new text message, a new twitter message, a new photo upload, or in our case, an Alexa phrase. There are also many actions, for example, send a text message, send an email, post a message on facebook, or in our case, send an web request to OpenSprinkler. With IFTTT, you can easily set up recipes like: ‘if temperature drops below xx degrees, send me a text message’, ‘if there is a new post on my facebook, send me a push notification’, or in our case ‘if Alexa receives a specific phrase, trigger a sprinkler action’. Because it’s so convenient, it has become very popular among Internet of Things.
How does IFTTT send or receive web requests?
IFTTT provides support to what’s called a ‘Maker Channel’, allowing you to use generic web requests (i.e. HTTP commands) as triggers and/or actions. This makes it possible to extend IFTTT support to your own DIY hardware gadgets. For example, to use a Maker trigger, just have your gadget send a web request to IFTTT, and hook it up with an action, such as text message, to enable push notification. This way, when OpenSprinkler starts to run any program, or receives weather changes, it can send a web request to IFTTT, which further triggers a text message or push notification to your phone. Conversely, to use a Maker action, you can set IFTTT to send a web request to your gadget. This way, when it receives an associated trigger, it can send a command to OpenSprinkler to start an action. As both OpenSprinkler and OpenGarage implement HTTP GET commands, they can naturally work with IFTTT through the Maker channel.
Wait, what’s the catch?
There are two. First, to use the device as a trigger, the firmware needs to connect to IFTTT. Neither OpenSprinkler nor OpenGarage has firmware support currently to send web requests to IFTTT, you can’t use them as a trigger yet, but work is underway to add such support to the firmware. Second, to use the devices for action, IFTTT needs to reach the device from the Internet. This requires you to set up port forwarding so that IFTTT can use the public IP address to reach the device. I know that port forwarding is gradually phasing out in favor of cloud-connected devices, but for now we will have to stick with port forwarding.
Now I have explained how IFTTT works, let’s go ahead and create some recipes.
Step 1. Sign up for an IFTTT account
Go to ifttt.com, click on ‘Sign up’ to register an account. You will walk through a simple tutorial to learn the basics of IFTTT.
Step 2. Enable Maker channel
Click on ‘Channels’ at the top, then search for ‘Maker’ and under ‘Developer Tools’ select the Maker channel, and click on ‘Connect’. You will be assigned a ‘key. At the moment you don’t need the key, so you can ignore that for now.
Step 3. Set up a recipe
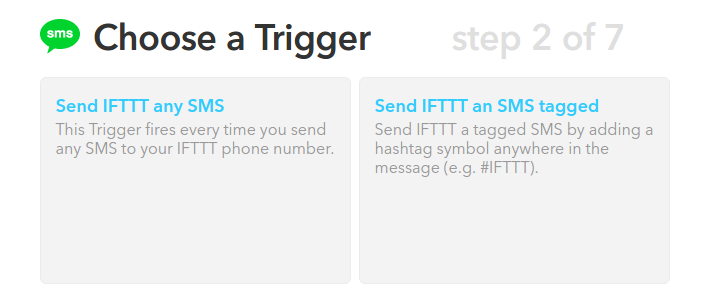
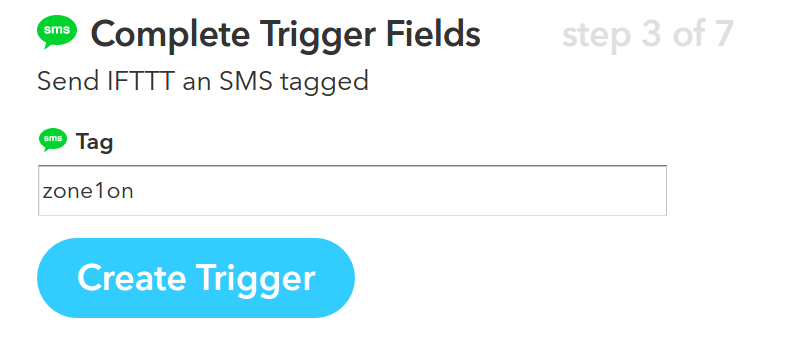
Click on ‘My Recipes’ at the top and then ‘Create a Recipe’. Select a trigger (i.e. this) — for example, search ‘sms’ and select SMS as a trigger. Input your phone number and a verification pin. Then select a trigger method, such as ‘Send IFTTT an SMS tagged’. Then input the tag phrase, such as zone1on. This means every time IFTTT receives a text message with that particular phrase, it will trigger an action.
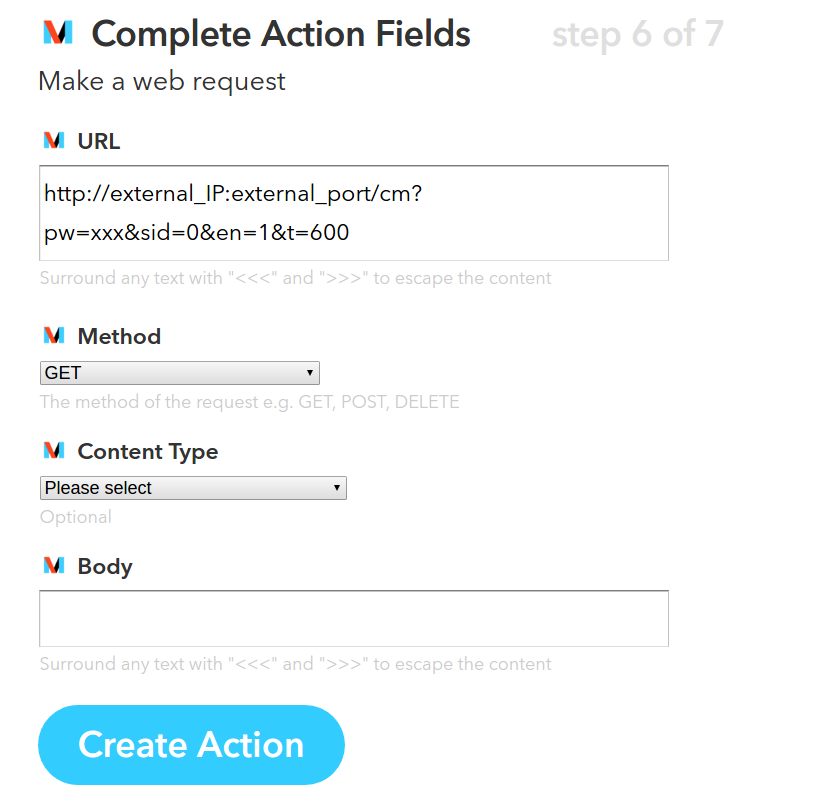
Next, to choose an action (i.e. that), search for ‘Maker’, and click on ‘Make a Web Request’. This is where you need to input the HTTP command. You will need to type in your home network’s external IP address, external port number (that maps to OpenSprinkler through port forwarding), followed by a supported HTTP command (check API document listed below), device password, and required parameters. The example below turns on zone 1 (i.e. sid=0) for 10 minutes (i.e. 600 seconds). For ‘Method’, select ‘GET’, and you can leave Content Type and Body empty. If you are not sure whether the command works or not, simply copy and paste the URL you constructed to a browser, and if the returned message has {‘result’:1} that means it has succeeded.
Click on ‘Create Action’ to finish.
In case you’ve got lost, here are some useful links that you may need to refer to:
Note that device password must be in MD5 hash. For example, if the plain text password is ‘opendoor’, its MD5 hash is a6d82bced638de3def1e9bbb4983225c. You can find an online MD5 hash generator to help you.
Station ID (sid) starts from 0 (as in programming convention). So zone 1’s sid is 0 zone 2 is 1 and so on.
Step 4. Test the recipe
To test the above example recipe, send a text message #zone1on (don’t forget the pound sign!) to the IFTTT phone number (this is the same phone number you received a text from when you verified your phone with IFTTT). If everything is set up correctly, your sprinkler zone 1 will start watering for 10 minutes!
Step 5. Use Alexa to enable voice command
Now that I’ve walked you through a basic example, you can experiment with using Alexa to enable voice command. You obviously need to have an Alexa (Amazon Echo) for this to work. The recipe is largely the same as the above text message example, except that for trigger (i.e. this) you will select Alexa, and give it a phrase. Now when you speak that phrase to Alexa, it will trigger the action. How exciting! Don’t forget that you need to say ‘Alexa, trigger xxx’ where xxx is the phrase. The ‘trigger’ keyword is kind of like the pound sign in the text message.
If you have an OpenGarage, you can also follow the OpenGarage API to set up web requests and get Alexa to open / close the garage door for you.
Currently as the phrase is fixed / static, there is no easy way to parametrize the phrase. For example, you can’t say ‘trigger open zone 1 for blah minutes’ where ‘blah’ is a variable like 10, 20 or any positive integer you want. I am sure this would be possible in the future though.
Next Step: Notifications
As I said, another popular use of IFTTT is for email / text / push notifications. For doing so, the device needs to send HTTP commands to IFTTT. Upon receiving the request, it can trigger an action such as sending you an email or text message. Work is under way to add this support to both OpenSprinkler and OpenGarage firmware, and hopefully they will be ready soon!
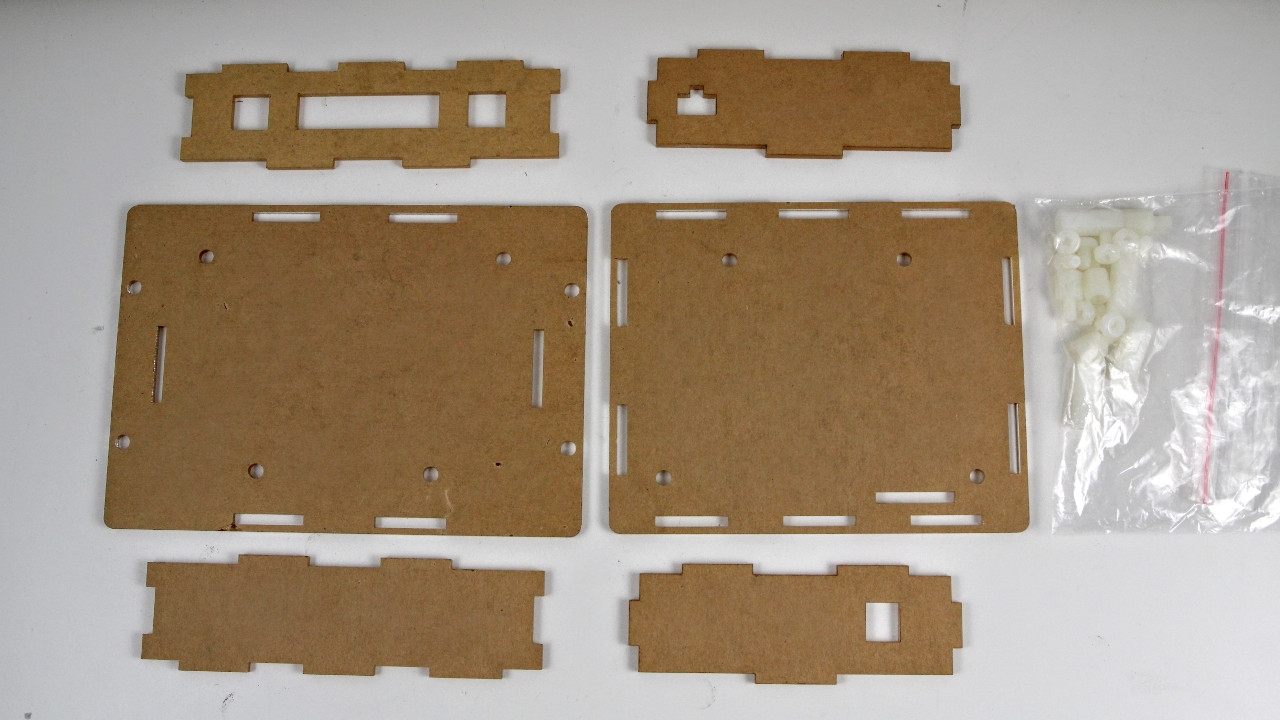
For a long time, OpenSprinkler Pi (OSPi) has been using the OpenSprinkler injection molded enclosure. While this has worked fine, the enclosure is not particularly designed for OSPi, leaving some cutouts not aligned with Raspberry Pi. Recently I have started learning to design enclosures using laser cut acrylic pieces. This is a great way to design fully customized enclosures for circuits. Today the first batch of laser cut enclosures for OSPi has arrived, and we will be shipping these with OSPi kit right away.
Here is a picture of the enclosure pieces and screw bag:
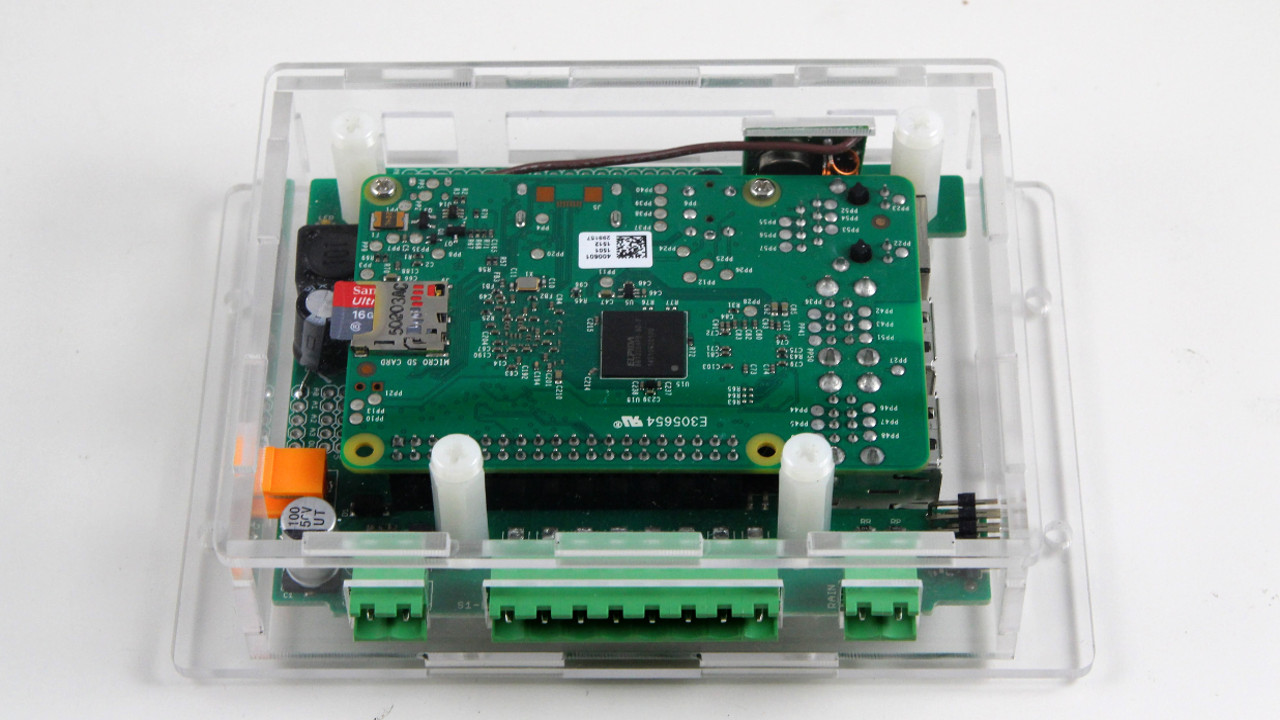
And here is a picture of the enclosure after it’s fully assembled. After removing all the protective papers from the acrylic pieces, it produces a fully transparent look of OSPi, which is pretty cool.
It’s not necessary to remove all the protective papers. I would recommend leaving the papers on except the top panel. This way it gives a kind of wooden texture of the enclosure, and adds more protection to the enclosure.
Below is an instructional video that walks you through the assembly steps:
I will make a separate post shortly that explains how to automate the design of such laser cut enclosures.
My fortune cookie last night said I have recently left many things undone, and at this rate I may never get them done. Quite alarming indeed. One of the things I haven’t done well recently is regular posting on this blog. So I’ve decided that before the year ends, I have to remedy this by writing a couple of new posts.
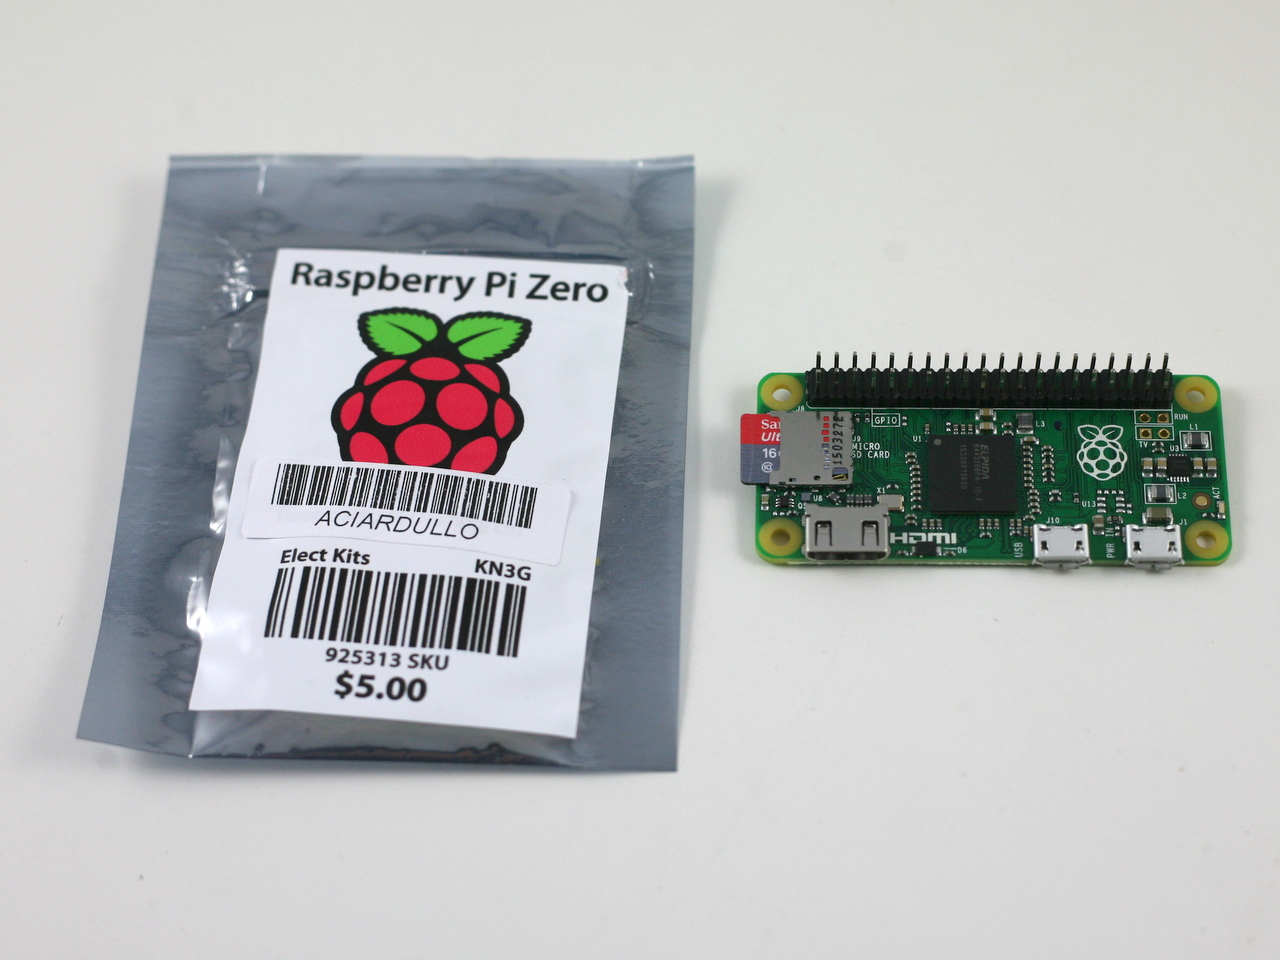
The first order of business today is Raspberry Pi Zero. I am sure many of you have heard of it, which is the latest new comer in the Raspberry Pi family, and it has a jaw-dropping price of $5. Five dollars for a tiny computer that runs a full Linux system, how amazing is that! Well, since announced, it’s in such high demand that it went out of stock at most online stores. I’ve been waiting to get my hands on one for a while. A few days ago I was visiting friends in Long Island, New York and discovered that surprisingly I can get the Zero from Micro Center retail stores. So I went and purchased one in their Westbury store. It took me a while to find it in a locked cabinet, and apparently it’s limited to one board per customer. It’s such an anomaly, because normally things in high demand and so difficult to get would be very pricey, but this is only $5!
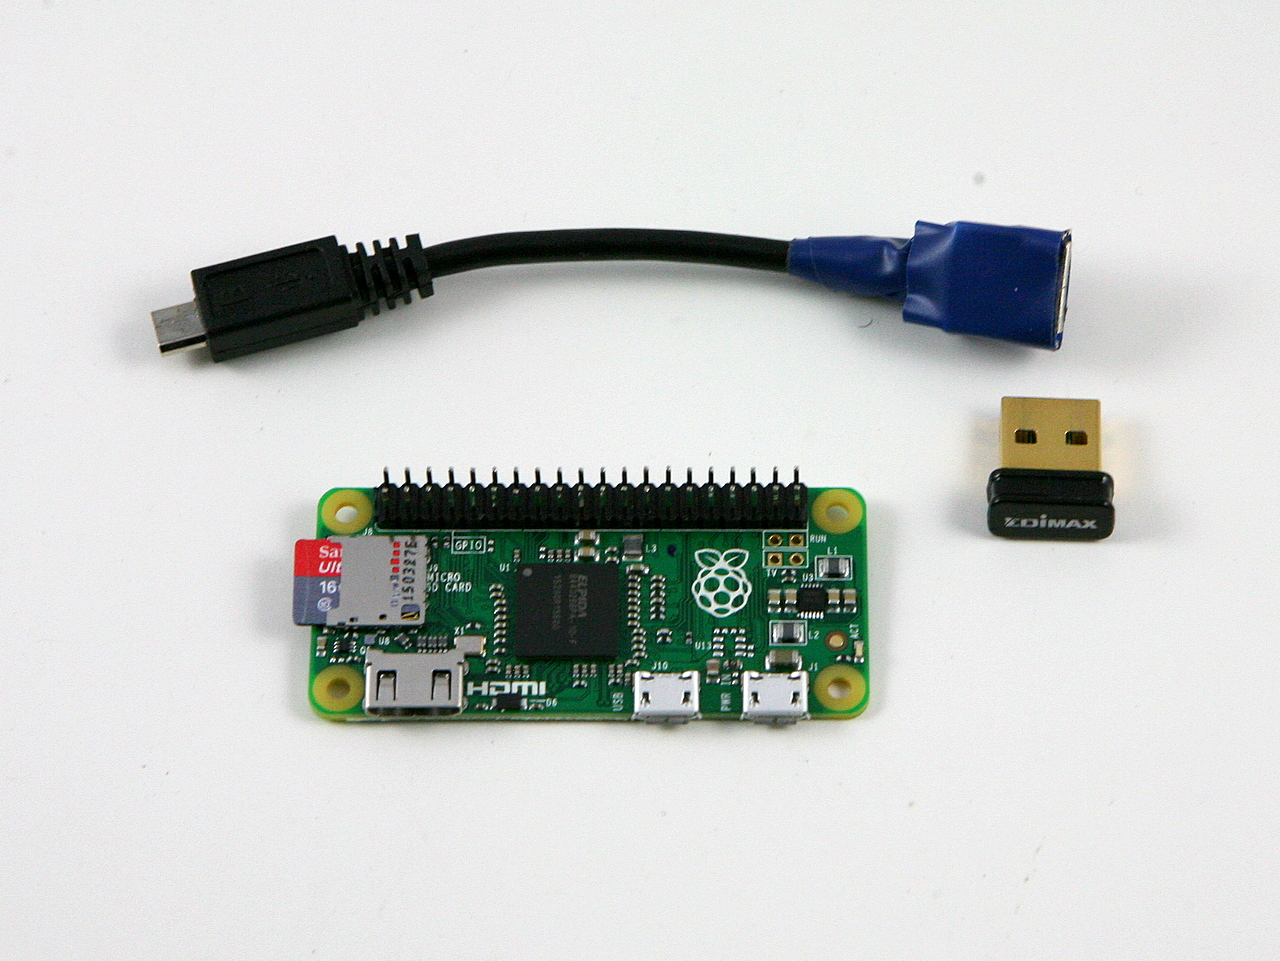
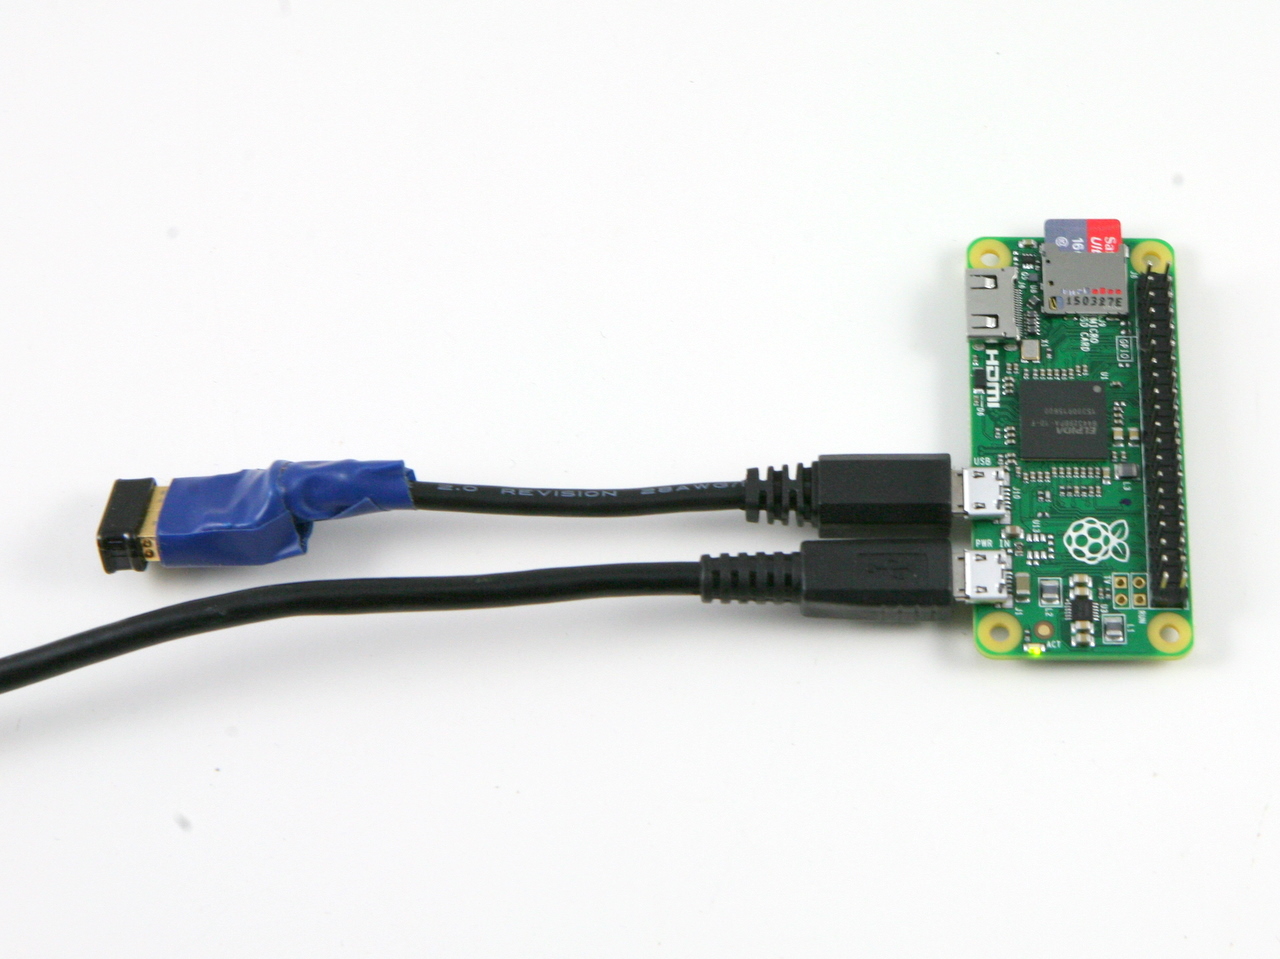
The main reason for me to get one is to verify if it works well with OpenSprinkler Pi, as several customers have asked me. The answer is yes, as the video demo below shows. But before you decide to dive in, you should be aware of the hidden costs, which can quickly add up. First, to reduce cost the Zero does not have the 2×20 pin headers pre-soldered, and it doesn’t have a standard size USB connector. This means in order to use it with OpenSprinkler Pi, you need to hand solder the pin headers; and in order to connect it to a USB WiFi dongle, you need a microUSB to USB adapter, which is commonly known as the OTG (USB On-the-Go) adapter. If you are not willing to go through the hassle, you’d be better off staying with Raspberry Pi A+, which is only $20.
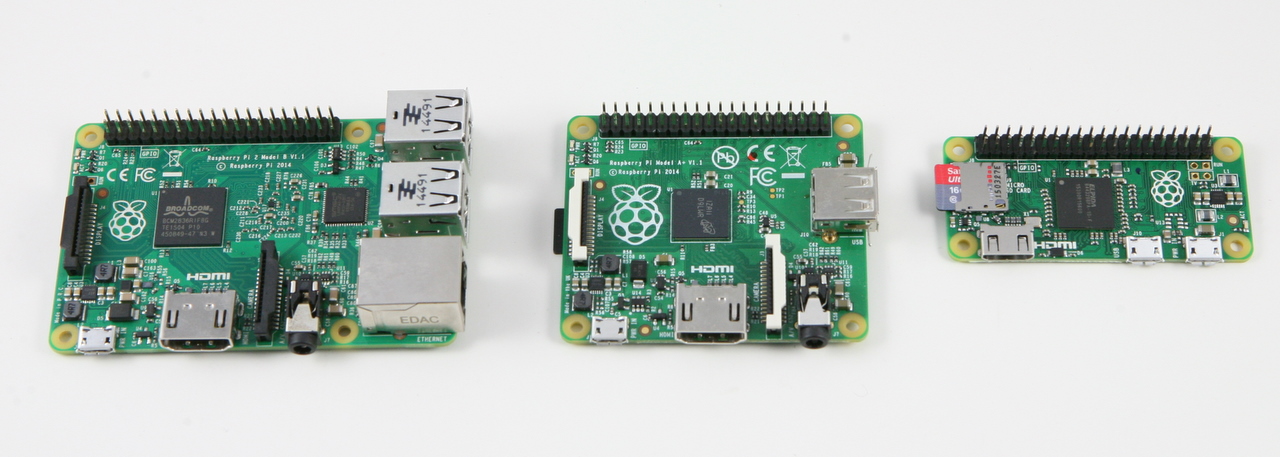
Here is a display of three Raspberry Pi’s: version 2 model B, A+, and Zero.
The OTG adapter I ordered hasn’t arrived yet, so I decided to make one myself. It’s quite easy: just cut the connectors from an existing microUSB cable and USB extension cable (which has a USB A female connector), strip them, solder the four internal wires with matching colors, and use some hot glue and electric tape to fix everything in place. I then burned a new microSD card (with the latest Raspbian image) and installed the OpenSprinkler firmware. Plug it into the OpenSprinkler Pi circuit board, and insert 24VAC power supply: Voilà, it boots up in under a minute and I can start turning on and off sprinkler valves right away. There you go, it’s verified! For those who want to see real actions, check out the Youtube video below.
Currently the OpenSprinkler Pi circuit board doesn’t have screw holes that match those on the Zero. The consequence is that the Zero won’t have much physical support other than the 2×20 pin header, which is pretty tight and does provide reasonable support. I will have to modify the board design to incorporate the screw holes. I am half hoping that the Raspberry Pi foundation would release a new version of Zero with the pin headers pre-soldered and a standard size USB connector. Not sure if this will ever happen, but we will see!
NOTE: this is a post that first appeared at the Rayshobby Blog. We are re-posting it here (with a couple of updates) to emphasize that OpenSprinkler is not only made in the USA, but made locally (at the Pioneer Valley region in Massachusetts) to support our local business. Hope you like it!
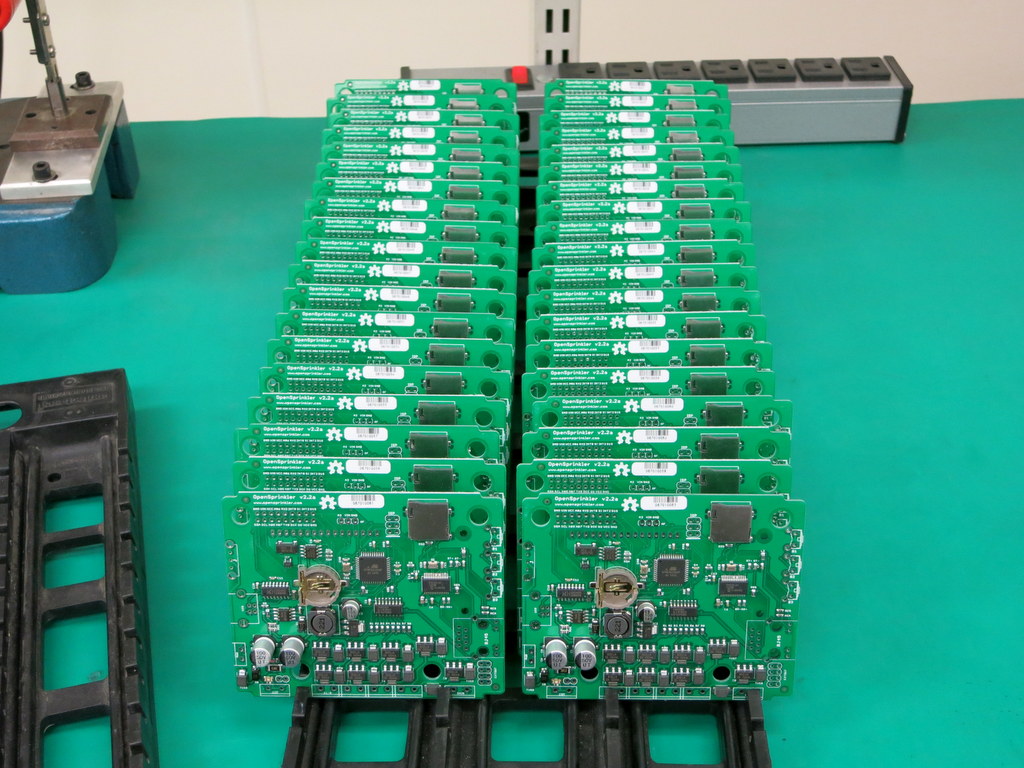
Since March this year, orders of OpenSprinkler have been increasing rapidly. Within a couple of weeks, we’ve done two batches of OpenSprinkler 2.3 at our local manufacturer — Worthington Assembly Inc. (WAi). Previously I have blogged about OSPi manufactured at WAi, and I’ve shown videos of their SMT surface mount manufacturing pipeline, including pick and place machine and reflow oven. This time, I was able to get two great videos of the selective soldering machine, which is used for through-hole soldering. Check the video here:
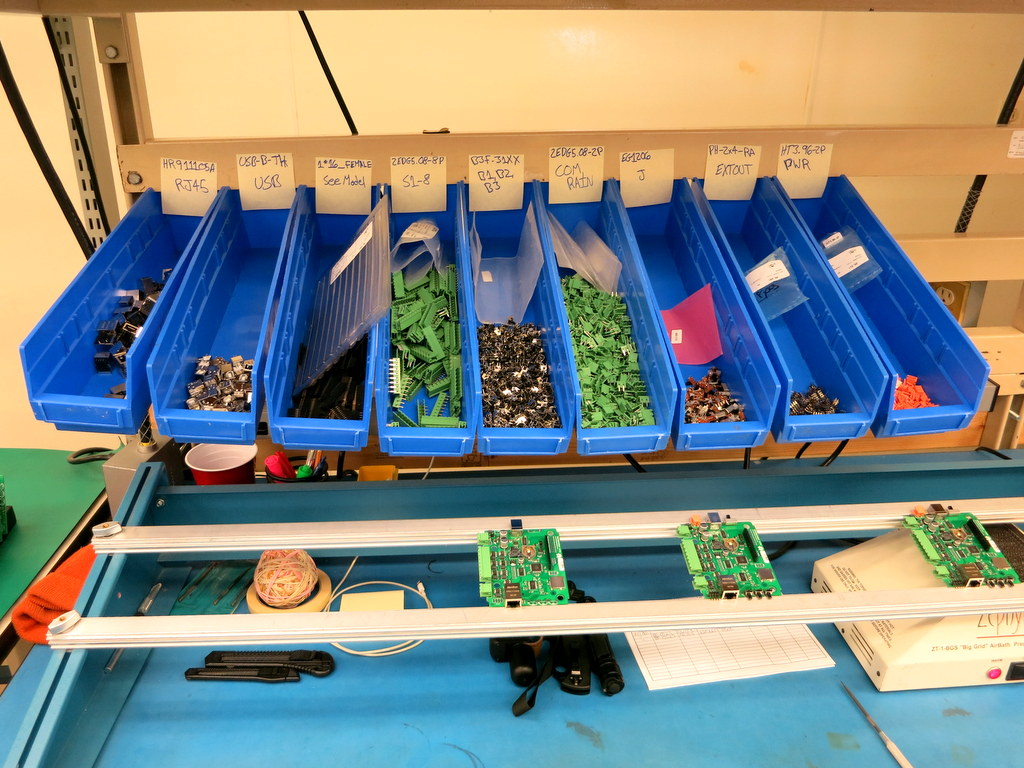
Below are some snapshots. First, before soldering, the boards are queued, and all through-hole components are hand inserted to the board,
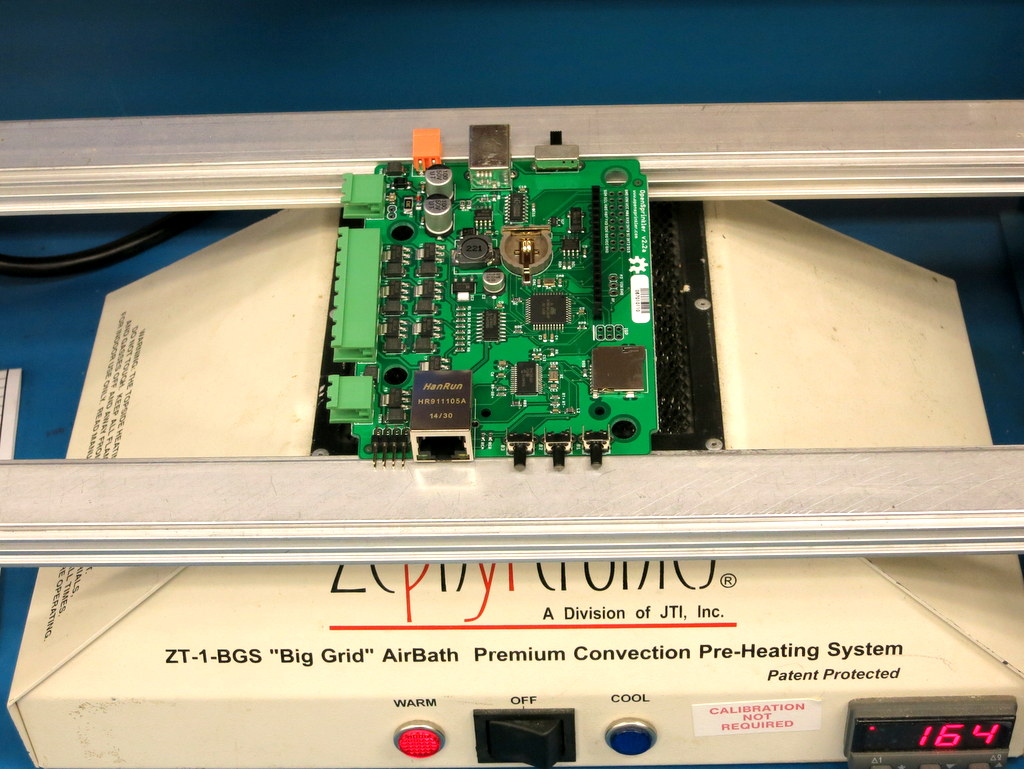
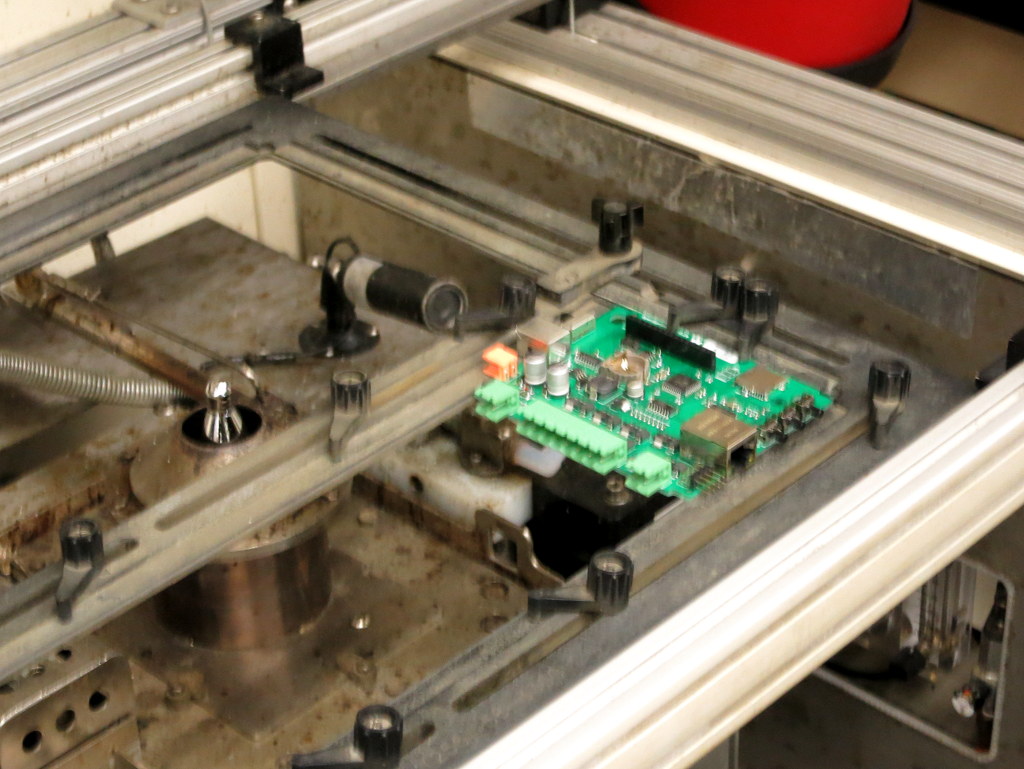
Next, each board goes through a pre-heating machine to get pre-heated, and then sent to the selective soldering machine. The selective soldering includes a fluxing phase, and soldering phase. Check the video above for details.
This is the result of the selective soldering. Looks very nice, and much better than hand soldering!
One of the main benefits of manufacturing locally is the convenience and excellent turn-around time: every order we placed at WAi has been completed within 2-3 weeks, sometimes within 10 days, which is amazing. Also, if there is any technical issue with an order, we can drop by the factory and get the problem solved right away. You certainly get better pricing with Chinese manufacturers — we’ve done that in the past. But the frequent delay there causes a lot of mental stress, and technical issues often take days to resolve. So over time we’ve learned that the convenience and fast turn-around time with local manufacturer are well worth the added cost.
(Update) We’ve started shipping OpenSprinkler 2.3 since early this year. Compared to the previous version (2.0 to 2.2), the biggest change in 2.3 is that the microcontroller has been upgraded from ATmega644 to ATmega1284, which has twice as much flash memory space, and four time main memory. This provides plenty of flexibility in terms of firmware upgrades in the future. The most recent batch (made in October 2015) also added an AC current sensing circuit, composed of a current sensing resistor and precision rectifier based on op-amp. This allows OpenSprinkler to sense the amount of current flowing through sprinkler solenoids. At normal operating condition, each solenoid draws about 150 to 300mA AC current. Having the current sensing circuit makes it easy to verify how well the solenoids are functioning electrically, and detect early signs of solenoid failure.